Since tubes of different materials, sizes, ages, and durometers produce different
flow rates, the CALIBRATE key allows you to calibrate each piece of tubing you
use. Calibration accuracy data is shown in Table 9-1 in Chapter 9. Once the
tubing is calibrated, you no longer need to be concerned about flow rate
variances outlines in Table 9-3.
Along with the usual pumping equipment (pump(s), pump motor), you will
need calibrated beakers or cylinders to function as source and drain
containers.
1. Before you initiate the calibration process, you must set the pump up for
pumping in the same direction as you plan to use during normal pump
operation (refer to Section 5.2). In addition, make sure the display shows
STOPPED Display Mode (the motor is not running).
2. Set either the RPM or FLOW RATE setting of the pump motor:
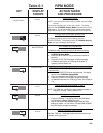
2a. To set the RPM, press the RPM key. The display flashes the current RPM
setting (xxx rpm). Use the UP and DOWN ARROW keys to adjust the
setting.
2b. To set the FLOW RATE, press the TUBE ID key and use the UP and DOWN
ARROW keys to select the inner diameter of the tube you are using. Press
the FLOW RATE key. Use the UP and DOWN ARROW keys to adjust the
setting.
3. When the display shows the RPM or FLOW RATE setting you desire, you are
ready to initiate the calibration process.
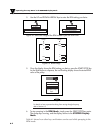
4. Press the CALIBRATE key. The display should flash and show, “Prime or
START ?”.
5. To prime the tube, press and hold down the PRIME key. As long as you hold
down the PRIME key, fluid flows in the tube, and the display shows,
“Priming...”.
6. When fluid has completely filled the tube, simply release the PRIME key. The
pump motor stops running, and fluid stops flowing.
7. To dispense fluid for calibration, hold the tubing outlet over the drain container
and press the START/STOP key. Fluid flows, and the display enters the Running
Display Mode, showing the message, “Dispensing...”.
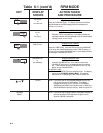
8. When you have allowed fluid to dispense for a minute or two, press the
START/STOP key to stop the pump. Fluid stops dispensing, and the display
returns to the STOPPED Display Mode. The display momentarily flashes the
message, “Enter TOTAL VOL.” and then flashes the total volume dispensed (xxx
ml or xxx Liters) alternating with the message “Start or CAL ?”.
9. To continue to dispense fluid, press the START/STOP key again. Fluid flows,
and the display returns to the Running Display Mode, showing the message,
“Dispensing...”.
Operating the Pump Motor in the STOPPED Display Mode
5
5-7
NOTE


