


3. Installation
a. Apply Sound Attenuation Blanket. Spray adhesive, duct tape, or 3M adhesive tape may be used
to hold down the sound blanket to the sub floor.
b. Old carpet or resilient floor to substitute Sound Attenuation Blanket: For retrofit installation over
existing commercial rated low-pile carpet, carpet tile, PVC tile and sheet vinyl, step a and b may be
omitted. Depending on the old floor covering, Sound Attenuation Blanket may also be skipped.
However, application over thick foam-backed or cut pile carpet is not recommended.
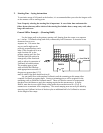
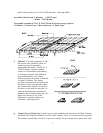
c. Starting along the wall with half-size Base Connector:
First, use a knife or snap on a straight edge to cut Base Connector into halves.
Position original perimeter side of half-Connectors
against the wall surface, allowing a uniform
+/- .08”(2 mm) offset. Along the starting line,
connect corner feet of the first row
UniPanels. (Drawing D608)
D608
d.
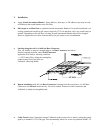
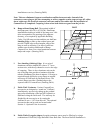
Repeat installation with full size Base Connectors: Starting from the second row, use full Base
Connectors to UniPanels consecutively. No tool is needed. Extension of the Connectors and
UniPanels is simple and straightforward.
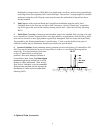
e. Cable Trench: Base Connectors connect UniPanels at their corner feet as shown, setting the panels
apart by a standard 3.54”(9 CM) gap. This automatically allows for a two-way uniform-width 3.54”
3