


2. Starting Line – laying instructions
To maximize usage of full panels at the borders, it is recommended that you select the longest walls
or the entrance wall as starting point.
Note: Properly selecting the starting line is important. It saves labor time and materials.
Other factors that may affect choice of the starting line include: door, ramp, entry wall, other
long walls and so on.
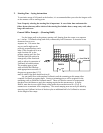
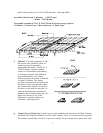
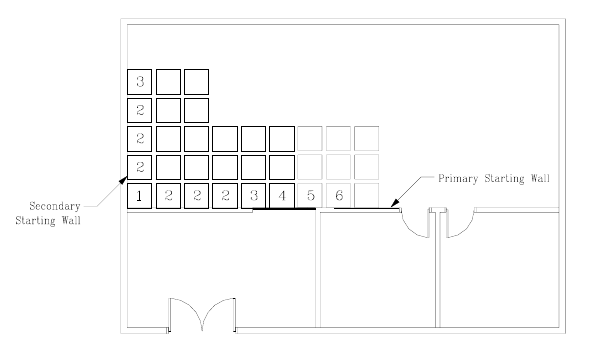
General Office Example – (Drawing D605)
Use the longer wall as the primary starting wall. Starting from the corner, test sequence
no. 1 and no. 2 UniPanels along both walls, connected by half-Connector. If extension is not
obstructed, move on to
sequence no. 3. Be aware that
any two walls might not be
perfectly perpendicular to each
other. If the second wall is at an
angle less than 90° to the
primary starting wall, the first
UniPanel laid will need to be
strategically offset from both
walls to allow for extension of
UniPanels in both directions.
The resulting gaps to both
walls will then
be filled up
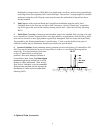
with appropriate accessories. If
the gaps are greater than 1/5”(5
mm) in width, Edge Rail should work well.
D605
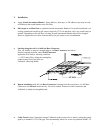
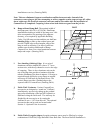
D605A
Lay out entire floor with complete UniPanels until the remaining walls cannot allow
complete UniPanels up against them. Cutting or trimming pieces will be required for the
remaining walls to finish the UniPanel matrix. There will also be removal of some panels
that have been laid down to apply the ramping required at the entranceways. In figure
D605A, note that in cases where doors swing inside the room their must be a 25 sq. ft.
entrance area to maintain ADA compliancy. The actual ramping area can easily be added by
removing one UniPanel in front of the door plus an additional half of a UniPanel to account
for the length of the ramps.
2