


66
OPERATING PROCEDURE PHOTOS
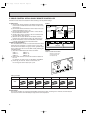
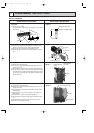
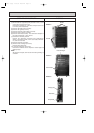
8. Removing the lineflow fan and the fan motor
(1) Remove the left and right side panels.
(2) Remove the grills.
(3) Remove the electrical parts box.
(4) Remove the drain pan.
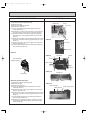
(5) Loosen the screw that fixes the lineflow fan to the fan
motor. (See Photo 7. )
(6) Remove the 4 screws of the motor fixture, and remove the
fan motor and the motor fixture at a time (See Photo 8.)
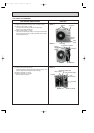
(7) Remove the screws of the left and right motor supports,
and remove the motor supports and the fan motor. (See
Photo 9.)
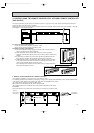
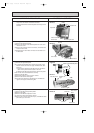
(8) Remove the 2 screws on the left and right sides of the heat
exchanger, and pull the bearing support toward you. (See
Photo 11.)
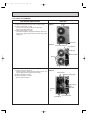
(9) Remove the screw of the center support, and remove the
support. (See Photo 10. )
(10) Pull the left-hand side of the heat exchanger toward you,
and remove the lineflow fan.
9. Removing the electrical heater.
(1) Remove the left and right side panels.
(2) Remove the grills.
(3) Remove the drain pan.
(4) Loosen the screw that fixes the lineflow fan to the fan
motor.(See Photo 7.)
(5) Remove the screw of the center support, and remove the
support. (See Photo 10.)
(6) Remove the 2 screws on the left and right sides of the heat
exchanger, and pull the bearing support toward you. (See
Photo 11.)
(7) Pull the left-hard side of the heat exchanger toward you,
and remove the lineflow fan.
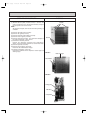
(8) Remove the heater fixing screws (1 screw each on right
and left sides), and slide the heater element to the left to
remove the heater.
Photo 12
Heat exchanger
Heater element
Heater fixing screws
Photo 10
ScrewCenter support
Lineflow fan
Photo 9
Photo 11
Photo 8
Photo 7
Screw
Motor
support
Motor support
Screw
Fan motor
Motor fixture
Fan motor
Screw
Screw
Fan motor
Lineflow fan
Lineflow fan
Bearing support
Heat exchanger
OC120--3.qxp 24/6/97 12:56 AM Page 66