


9
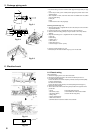
6. Electrical work
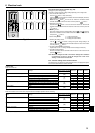
Function table
Select unit number 00
Mode Settings
Mode no.
Setting no.
Initial setting
setting
Wired remote controller
(RF thermostat)
Power failure automatic recovery Not available
01
(101)
1
Available
+
2Ο
Indoor temperature detecting Indoor unit operating average
02
(—)
1Ο
Set by indoor unit’s remote controller 2
Wired remote controller’s internal sensor 3
LOSSNAY connectivity Not Supported
03
(103)
1Ο
Supported (indoor unit is not equipped with outdoor-air intake)
2
Supported (indoor unit is equipped with outdoor-air intake) 3
Power voltage 230 V
04
(104)
1
208 V 2Ο
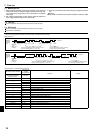
Select unit numbers 01 to 03 or all units (AL [wired remote controller]/07 [wireless remote controller])
Mode Settings
Mode no.
Setting no.
Initial setting
setting
Wired remote controller
(RF thermostat)
Filter sign 100Hr
07
(107)
1
2500Hr 2Ο
No filter sign indicator 3
Fan speed Silent
08
(108)
1
Standard 2 Ο
High ceiling 3
Up/down vane setting No vanes
11
(111)
1
Equipped with vanes (vanes angle setup
)2Ο
Equipped with vanes (vanes angle setup
)
3
+
When the power supply returns, the air conditioner will start 3 minutes later.
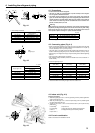
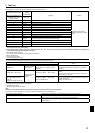
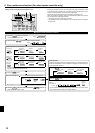
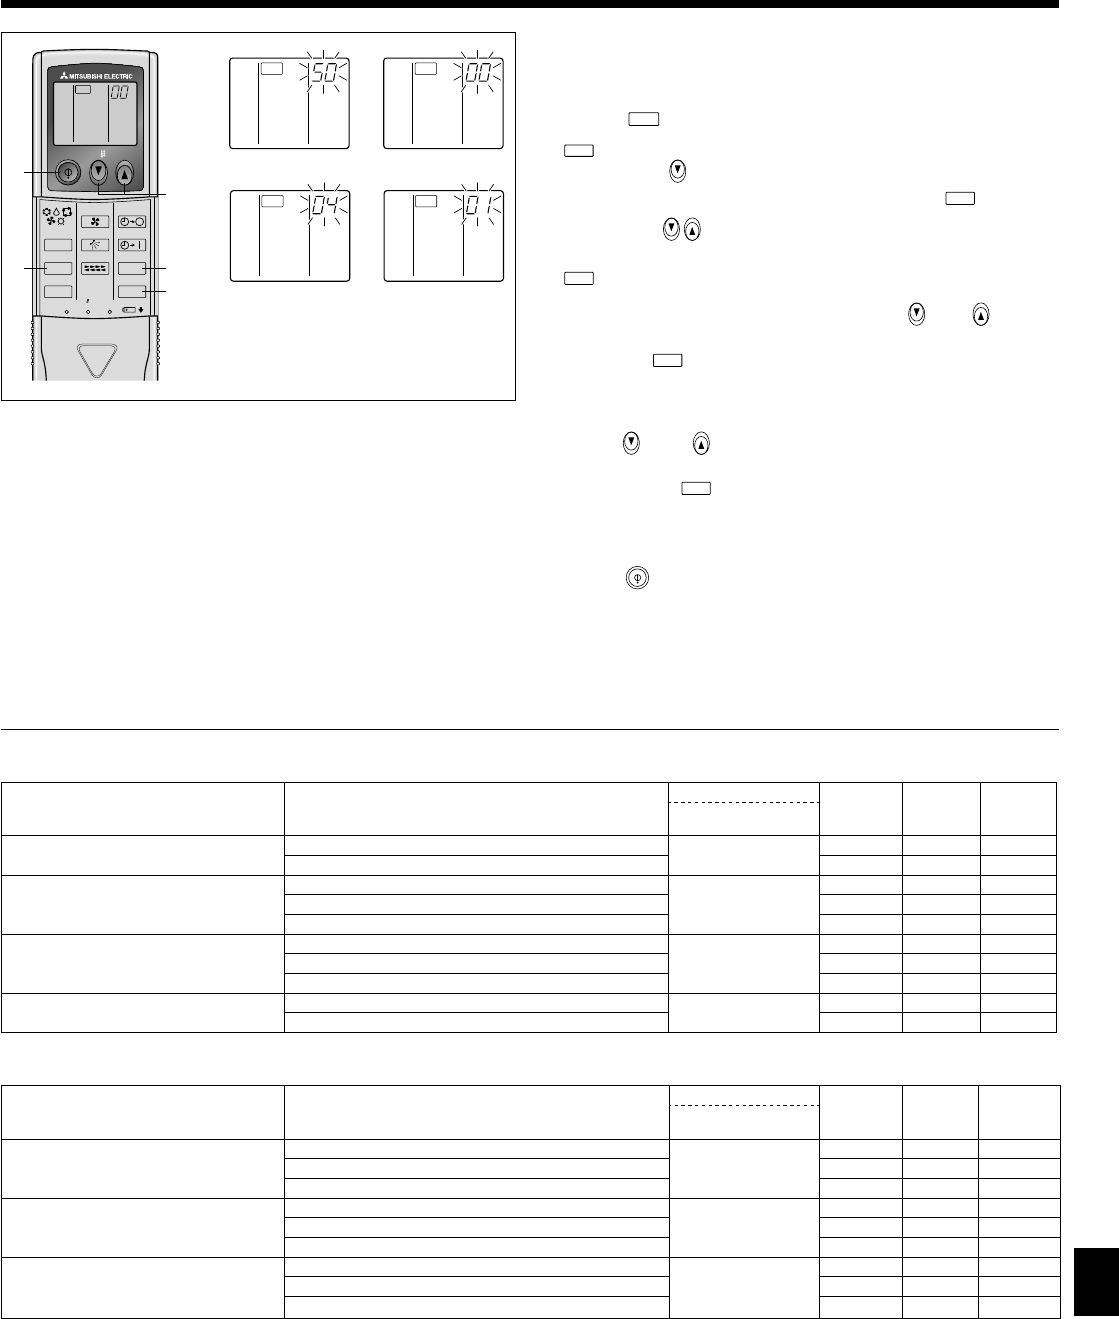
2) For IR wireless remote controller (Fig. 6-6)
Changing the power voltage setting
• Be sure to change the power voltage setting depending on the voltage used.
Go to the function select mode
Press the
CHECK
button
twice continuously.
(Start this operation from the status of IR wireless remote controller display turned off.)
CHECK
is lighted and “00” blinks.
Press the temp
button
once to set “50”. Direct the IR wireless remote
controller toward the receiver of the indoor unit and press the
h
button
.
Setting the unit number
Press the temp
button
and
to set the unit number “00”. Direct the IR
wireless remote controller toward the receiver of the indoor unit and press the
min
button
.
Selecting a mode
Enter 04 to change the power voltage setting using the
and
buttons.
Direct the IR wireless remote controller toward the receiver of the indoor unit
and press the
h
button
.
Current setting number: 1 = 1 beep (one second)
2 = 2 beeps (one second each)
3 = 3 beeps (one second each)
Selecting the setting number
Use the
and
buttons to change the power voltage setting to 01
(230 V). Direct the IR wireless remote controller toward the sensor of the indoor
unit and press the
h
button
.
To select multiple functions continuously
Repeat steps
and
to change multiple function settings continuously.
Complete function selection
Direct the IR wireless remote controller toward the sensor of the indoor unit and
press the
button
.
Note: Whenever changes are made to the function settings after installation
or maintenance, be sure to record the changes with a mark in the
“Setting” column of the Function table.
6.3.2 Function setting on the remote controller
For details on how to operate the remote controller, refer to the appropriate opera-
tion manual included with each remote controller.
CHECK
CHECK
ON/OFF TEMP
FAN
VANE
TEST RUN
AUTO STOP
AUTO START
h
min
LOUVER
MODE
CHECK
RESETSET CLOCK
CHECK
E
C,D
F
A
B
Fig. 6-6
CHECKCHECK