


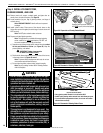
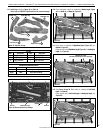
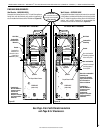
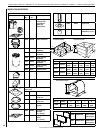

Top of Door Frame
Top of
Appliance
Spacers
FIREPLACE
(side view)
Min. 1 in*
(25 mm)
Min. 4 in*
(102 mm)
2 ft Vertical
Vent and
90° Elbow
Note: Non-combustible
sheathing and
housewrap (building
paper) should extend
to U-channels on
sides and bottom.
Wall Stud
Combustible
Sheathing
Non-combustible
sheathing required
below this point.
Extend housewrap
(building paper)
to this point.
Header
Non-combustible
~
*Insulation is
NOT ALLOWED in
clearance zones
around vent
components.
Keep this area free
from combustible
materials.
2 ft Vertical
Vent and
90° Elbow
Min. 1 in*
(25 mm)
Combustible
materials are
allowed on face
of appliance
above this point
Combustible
Finished Wall
Materials
Wall Stud
Top of Door Frame
FIREPLACE
(side view)
Top of
Appliance
Spacers
Min. 4 in*
(102 mm)
*Insulation is
NOT ALLOWED in
clearance zones
around vent
components.
Keep this area free
from combustible
materials.
Header
~
NOTE: DIAGRAMS & ILLUSTRATIONS ARE NOT TO SCALE.
31
See Page 4 for Cold Climate Insulation
and Page 9 for Clearances.
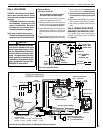
Figure 54
Wall Details - OUTDOOR SIDE
Complete finished exterior wall per the instructions provided
in the Outdoor Installation Kit and the instructions provided
here. To install the appliance facing flush with the finished
exterior wall, position framework to accommodate the
thickness of the exterior finished wall (Figure 54).
INTERIOR WALL FINISHING EXTERIOR WALL FINISHING
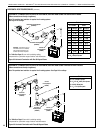
Wall Details - INDOOR SIDE(S)
Complete the finished interior wall. To install the appliance
facing flush with the finished wall, position framework to
accommodate the thickness of the finished wall (Figure 53).
Figure 53
LENNOX HEARTH PRODUCTS • MONTEBELLO
®
SEE-THROUGH DIRECT-VENT GAS FIREPLACES (LSM40ST-N / LSM40ST-P) • INSTALLATION INSTRUCTIONS
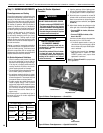
FINISHING REQUIREMENTS
IMPORTANT!
Min. clearance above any
horizontal vent component
is
4 in (102 mm).