


KRAMER: SIMPLE CREATIVE TECHNOLOGY
Contents
ii
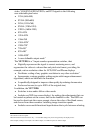
Figures
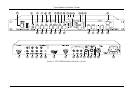
Figure 1: VP-719DS Seamless Switcher / Scaler 4
Figure 2: Connecting the PC 8
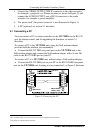
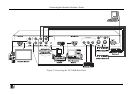
Figure 3: Connecting the VP-719DS Rear Panel 9
Figure 4: OUTPUT MODE LED Sequence 11
Figure 5: Locking / Unlocking the Front Panel 12
Figure 6: OSD Input Status 13
Figure 7: OSD Output Status 14
Figure 8: MENU Screen 15
Figure 9: Menu Screen Icons 15
Figure 10: Brightness and Contrast Screen 15
Figure 11: Gamma and Color Screen 16
Figure 12: Gamma, Color Temperature/Manager User 1/2 Screen 16
Figure 13: Source Selection Screen 16
Figure 14: Geometry (Scale and Zoom) Screen 17
Figure 15: Geometry (Scale: Aspect Ratio and Nonlinear) Screen 17
Figure 16: Geometry (Scale: Aspect Ratio) Screen 18
Figure 17: Geometry (Zoom) Screen 18
Figure 18: OSD Enlarge Status 19
Figure 19: Zoom Ratio Adjustment Example 19
Figure 20: Zoom Position Adjustment Example 19
Figure 21: Geometry (Zoom Ratio) Screen 20
Figure 22: Preset Position Control Keys 20
Figure 23: Navigation Control Keys 21
Figure 24: Geometry (Zoom Position Adjustment) Screen 21
Figure 25: Utility Screen 21
Figure 26: Graphic Setting Utility Screen 22
Figure 27: Graphic Setting Color Format Utility Screen 22
Figure 28: Video Setting Utility Screen 23
Figure 29: Video Setting Standard Utility Screen 23
Figure 30: Audio Setting Utility Screen 24
Figure 31: Audio Setting Stereo Utility Screen 24
Figure 32: Seamless Switch Utility Screen 25
Figure 33: OSD Setting Utility Screen 25
Figure 34: OSD Size Utility Screen 26
Figure 35: OSD Source Prompt Activation Utility Screen 26
Figure 36: OSD Blank Color Utility Screen 26
Figure 37: Output Setting Utility Screen 27
Figure 38: Output Setting Resolution Utility Screen 27
Figure 39: Output Setting Refresh Rate Utility Screen 28
Figure 40: Output Setting User Mode Setting Utility Screen 28
Figure 41: Factory Reset Utility Screen 29
Figure 42: Infra-red Remote Control Transmitter 30