


- WHERE TO INSTALL THE RO SYSTEM -
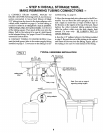
The RO assembly and storage tank is designed for
installation under the sink, usually in the kitchen or
bathroom. The RO assembly mounts on a wall sur-
face, or can lay on the cabinet floor next to the storage
tank. Hanger washers and wood screws are included
for cabinet wall mounting. The RO product water
faucet installs on the sink, or on the countertop next
to the sink (pages 6 and 7).
Note: Tubing lengths allow for the removal of the
assembly from the hanger washers for servicing. If
tubing lengths are shortened for neater appear-
ance, it may be necessary to keep the assembly on
the hanger washers for service.
in any remote location from the faucet, observing
safety guides on page 2. You do need a nearby water
source and drain point (see page 18).
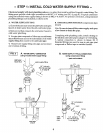
Water Supply: To provide supply water to the RO
system inlet, install pipe fittings for tubing connec-
tion, as typically shown on page 5.
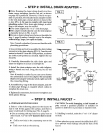
Drain Point: A suitable drain point is needed for re-
ject water from the RO membrane. A floor drain,
laundry tub, standpipe, sump, etc., is preferred, as
shown in the remote locations drawing, page 18. A
sink p-trap drain adaptor is included to install where
codes permit, as an optional drain point (page 6).
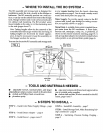
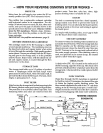
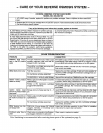
You can also locate the RO assembly and storage tank
RO
I RG. 2 ] / _--x _wate_:f°duuctt
drain adapter
sink drain RO Assembly
p -trap
- TOOLS AND MATERIALS NEEDED -
• adjustable wrench, standard pliers, and larger
adjustable jaw pliers or pipe wrench to fit sink drain
slotted and Phillips head screwdrivers
plumbers putty
• pipe joint compound (thread seal) approved for
use on potable water supplies
• electric drill and bits, if hole is needed for the RO
faucet, page 6 and 7
- 6 STEPS TO INSTALL -
STEP 1: - Install Cold Water Supply fittings - page
5
STEP 2: - Install Drain Adapter - page 6
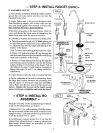
STEP 3: - Install Faucet - pages 6 and 7
STEP 4: - Install RO Assembly - page 7
STEP 5: - Install Storage Tank Make Remaining Tub-
ing Connections - page 8
STEP 6: - Sanitizing, Pressure Testing, Purging -
page 9
4