10
Masonry Fireplace Installation
When installing a GI425 DV Camden gas insert into
a masonry fireplace the insert will be vented
through dual 3” flexible gas aluminum liners.
This co-linear installation includes a pair of 3”
flex ducts that run from the insert completely
through the existing chimney to the termination
cap.
One liner is attached to the Exhaust Outlet on
the back of the unit and will carry the exhaust gases
to the outside of the house. This exhaust liner must
be directly connected to the unit and run the full
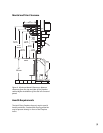
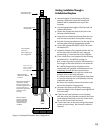
length of the chimney. See figure 7.
The other 3” liner will be attached to the Air
Intake Collar on the back of the unit to provide fresh
air for combustion. The Intake Collar is labeled for
easy identification. The liner must extend a mini-
mum of 6’ off the back of the unit and extend
through the damper area of the fireplace into the
tile liner of the chimney. This liner can also extend
the full length of the chimney and connect to the
termination cap.
IMPORTANT
If the intake flex does not extend the full length
of the chimney, forming a direct connection between
the unit and the termination cap, A METAL BLOCK
OFF PLATE MUST BE INSTALLED to seal the air intake
from room air. Normally this sealing plate will be
installed within the existing fireplace damper area.
See figure 7. The sealing plate is not necessary if a
direct connection is made between the cap and the
fireplace.
WARNING! Avoid cross venting the insert. Before
installation, label both ends of the exhaust flex pipe
to ensure connection to the appropriate collars on
the fireplace unit and vent termination cap.
Vent Guidelines
• All vent components must be installed in accor-
dance with the listing terms and manufacturer’s
instructions.
• Vent Height: Measured from the top of the insert
to the top of the termination cap.
Minimum: no less than 10'
Maximum: no greater than 35'. See figures 9 and 10.
The minimum vent height above the roof or
adjacent walls is specified by building codes. As a
general guide, follow the Gas Vent Rule on page
12.
• HORIZONTAL RUNS ARE NOT PERMITTED ANY-
WHERE IN THE VENTING SYSTEM.
• Venting liners used on this appliance may not be
less than 3” in diameter or greater than 3” in
diameter.
• Any unused flue or masonry enclosure can be used
as a passageway for venting provided the flue is
relined using 3” Listed flexible gas liner.
• The remaining space around the liner in a ma-
sonry or zero-clearance flue CANNOT be used to
vent any other appliance.
• Flexible liner components may not be exposed in
any living space.
• Installation of any components not manufactured
or approved by Jøtul or failure to meet all clear-
ance requirements will void all warranties and
could result in property damage, bodily injury, or
serious fire.
• Never modify any venting component, or use any
damaged venting product.
• THE GAS APPLIANCE AND VENT SYSTEM MUST BE
VENTED DIRECTLY TO THE OUTSIDE OF THE BUILD-
ING, AND NEVER ATTACHED TO A CHIMNEY
SERVING A SOLID FUEL OR GAS BURNING APPLI-
ANCE.
• Variable Vent Restriction: See the System Check
section on pages 22-23 for specific instructions.
IMPORTANT NOTICE:
THE USE OF AN EXISTING CHIMNEY AS
AN AIR INTAKE IS NOT COVERED UN-
DER THE ANSI Z21.88-1999-CSA 2.33-
M99 TEST METHODS AND RESULTING
ITS/WHI PRODUCT CERTIFICATION.
THE CODE AUTHORITY HAVING JURIS-
DICTION MUST BE CONSULTED PRIOR
TO PROCEEDING WITH THIS INSTALLA-
TION METHOD.
CANADA REQUIREMENT: Both the Intake and
the Exhaust liners must extend the full
length of the chimney and be securely
connected to both the unit and the termina-
tion kit.
If the fireplace has been modified to accom-
modate installation, use anchors or masonry
nails to attach the metal Fireplace Conver-
sion Notice Plate supplied with this unit to
the back wall of the masonry fireplace
firebox where it will be readily seen should
the insert be removed.


