


19
41277-01 05/98
®
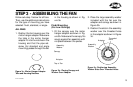
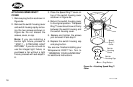
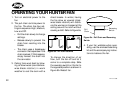
ATTACHING LIGHT FITTER TO
FAN SWITCH HOUSING
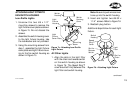
Low-Profile Lights
1. Unscrew the two #6 x 1/2"
mounting screws to remove the
light fixture cover plate as shown
in Figure 7c. Do not discard the
screws.
2.
Assemble the switch housing cover
to the light fixture housing. Use
the lockwasher and nut provided.
3. Using the mounting screws from
step 1, assemble the light fixture
cover plate and light fixture hous-
ing to the fan switch housing as
shown in Figure 7c.
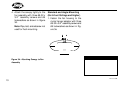
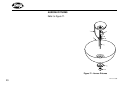
Switch
Housing
Slot for
Reverse
Switch
Slot for
Chain
Light
Fitter
Screws
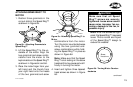
Figure 7d - Attaching Light Fixture
Speed
Ring™
Cover
continued
All Other Lights
1.
Align the slots in the light fitter
with the chain and reverse switch
on the switch housing as shown
in Figure 7d. The Speed Ring™
cover should sit firmly between the
light fitter and switch housing.
Note: Be sure to push wire connec-
tions up into the switch housing.
2. Insert and tighten two #6-32 x
1 1/4" screws. Refer to Figure 7d.
3. Reattach plug button.
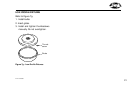
Additional steps follow for each light
fixture.
Figure 7c - Attaching Low-Profile
Light Fixture
Switch
Housing
Light
Fixture
Housing
Switch
Housing
Cover
Light
Fixture
Cover Plate
Mounting
Screw