


11
41277-01 05/98
®
STEP 4 - WIRING THE FAN
1. Disconnect the power by turning
off the circuit breakers to the out-
let box and associated wall switch
location.
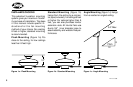
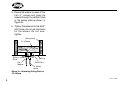
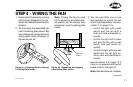
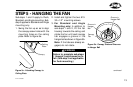
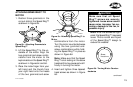
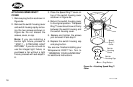
2. Tilt and hang the assembled fan
from the ceiling plate hooks. Slip
two rectangular canopy slots over
ceiling plate hooks as shown in
Figures 4a and 4b.
Note: To hang the fan you must
tilt the canopy to an almost verti-
cal position so the canopy slots
come down over the ceiling plate
hooks.
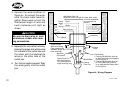
3. You can use either one or two
wall switches to control the fan
and/or lights separately. Use con-
nection 1 on page 12 to
• control the light with a wall
switch and the fan with a
chain pull (one wall switch re-
quired)
• control the light with a chain
pull and the fan with a wall
switch (one wall switch re-
quired)
• control the light with one wall
switch and the fan with an-
other (two wall switches re-
quired)
Use connection 2 on page 12 if
there is no separate wall switch
power wire for the light kit.
Note: Wall switches not included.
Figure 4b - Assembled Fan Hanging
from Ceiling Plate Hooks
Ceiling
Plate
Figure 4a - Attaching Slots on Canopy
to Ceiling Plate Hooks
continued