


R7426A,B,C TEMPERATURE CONTROLLER WITH AND WITHOUT REAL-TIME CLOCK
EN1B-0203GE51 R0507C 14
Displaying Actual Values
In the standard display mode, one of nine actual values, the
actual time, or the date can be selected and displayed by
pushing the
SEL
button.
The icons of the permanently displayed controller mode are
described in the following table:
Table 13. Icons
controller mode / status display
Off OFF - icon
Night
1)
Moon - icon
Standby Halfsun - icon
Comfort Sun - icon
Freeze Protection Alarm and
Operation
2)
Freeze protection icon in
addition
Low battery
1) 2) 3)
Battery icon
Optimum Start
1)
Sun icon is flashing ≈ 1Hz
1)
On controllers with real-time clock, only.
2)
Status information is displayed together with actual icon
for the controller mode.
3)
In order to improve battery lifetime, low battery detection
is performed only once a day and after power up.
If a displayed date is programmed to be a holiday, the
corresponding holiday icon is displayed on controllers with
real-time clock.
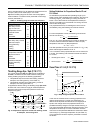
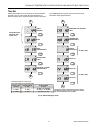
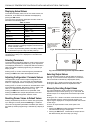
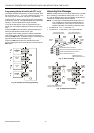
Selecting Parameters
The parameter/configuration selection mode is used to select
control and configuration parameters (Fig. 9) for adjustment.
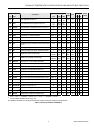
The displayed parameter no. corresponds with the number in
Table 4 and Table 5. Default programming is indicated by a
display of def.
Pushing the
+
or
-
button scrolls through the parameter list.
Pushing the
SET
button enters the adjustment mode.
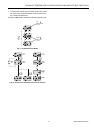
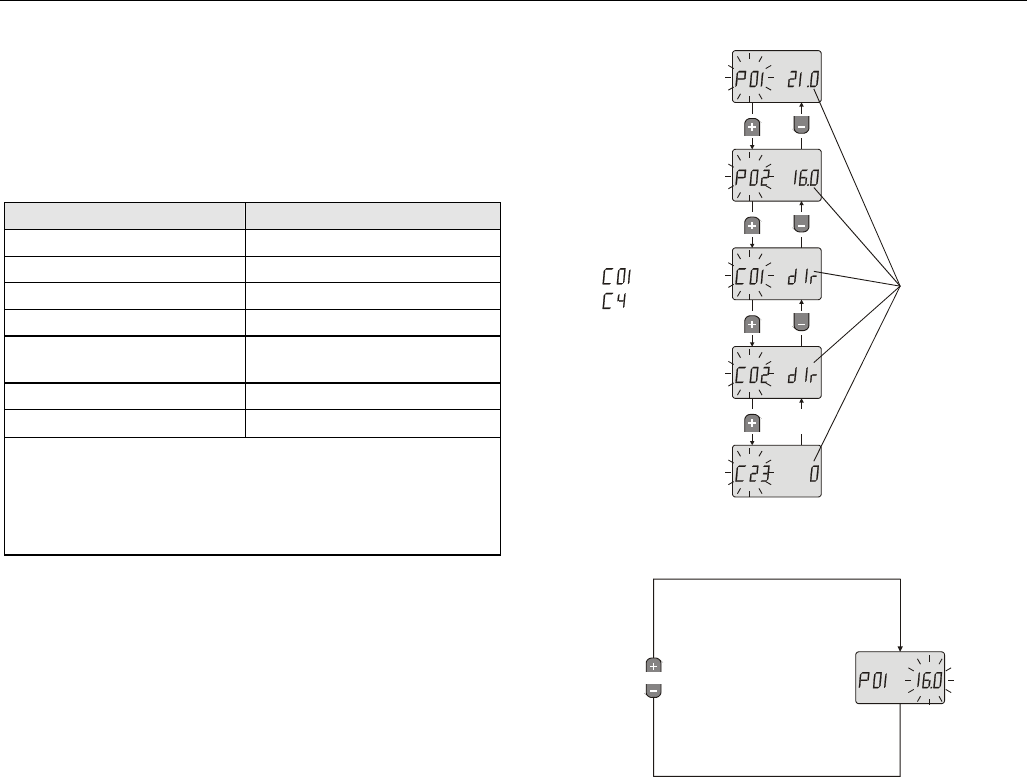
Adjusting Configuration / Parameter Values
The adjustment mode is used to adjust configuration and
parameter values (Fig. 10). In this mode, the selected para-
meter no. is displayed and the corresponding value flashes.
Pushing the
+
or
-
button increments or decrements the value
of the selected parameter. Ranges are shown in Table 4 and
Table 5. An adjustment example is shown in Fig. 18.
Pushing the
SEL
button retains the old parameter value.
Pushing the
SET
button accepts the parameter value and
returns to parameter/configuration selection mode.
Resetting Param. Values to Default Values
Pushing simultaneously the
+
and
-
button during the power
up or setting the control parameter
DefProg
to 1 resets all
control and configuration parameters to defaults (see Table 4
and Table 5). Default programming is indicated by a display of
def.
°C
°C
FIRST DISPLAYED CONFIGURATION
PARAMETER:
A
CTUAL
PARAMETER
VALUE
FOR R7426C
FOR R7426A,B
NOTE: CONTROL OR CONFIGURATION
PARAMETERS WHICH ARE NOT
AVAILABLE ON THE GIVEN
CONTROLLER VERSION ARE
SKIPPED.
Fig. 9. Parameter/Configuration Selection Mode
TO ADJUST
PARAMETER
VALUE
°C
OR
Fig. 10. Parameter/Configuration Adjustment Mode
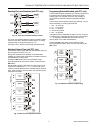
Selecting Output Values
The output selection mode is used to select the output no.
(see Fig. 11) for manual override adjustment. An activated
manual override is indicated by a displayed
F (fixed).
Pushing the
+
or
-
button scrolls through the output list.
Pushing the
SET
button enters the adjustment mode.
Manually Overriding Output Values
The output adjustment mode is used for manual override
adjustment of output values (see Fig. 12). In this mode, the
selected output no. is displayed and the actual output value
flashes.
Pushing the
+
or
-
button increments or decrements the value
of the selected output for manual override purpose. The
output range is displayed in correspondence with the nominal
control range.
To return to output selection mode, three options are
available:
• Pushing the
SET
-button after adjustment activates the
manual override (fixing) of output value.
• Pushing the
SEL
button, causes that the output value is
still determined by the control loop (no fixing).