


— 25 —
English
INSTALLING TONGUE AND GROOVE FLOORING
Caution regarding use of this Tool to install pre-finished flooring
This Tool was designed for use in installing unfinished hardwood
flooring. It can be used to install pre‑finished flooring when used
with the pre‑finish flooring accessory shoe; however, caution must
be used to ensure that the finish is not damaged by the Tool. In all
flooring applications, it is recommended that the Tool be tested on
a sample section to be certain that the Tool and technique of use do
not leave marks on the finish. This procedure should be followed
before each job due to variations in flooring and Tool condition.
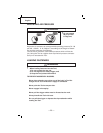
After squaring the floor and allowing for expansion as recommend‑
ed by the Wood Flooring Industry (NWFA, NOFMA and MFMA),
install felt vapor barrier and use chalk line to identify location of
subfloor nails prior to racking wood to be installed. This will help
prevent hitting subfloor nails which can cause damage to the driver
blade and jamming. Place the grooved edge of the first row of
flooring towards the wall on the side of the room from which you
are starting.
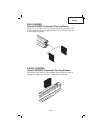
Face nail first four (4) rows of flooring.
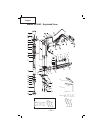
Install the tongue and groove shoe.
Place the groove of the fifth row of flooring over the tongue of the
fourth row of flooring and tighten using the hammer. Depress the
safety trigger, and tap ram head of the Tool with the tongue and
groove shoe installed.
Slide the Tool along the tongue of the flooring to the location at
which you desire to place the next fastener.
Continue until you have completely fastened all but the last five (5)
rows of flooring.
Install and face nail in place the remaining five (5) rows of flooring.