


9
ELECTRIC WIRING
These gas burners are manufactured for use with 120 volt, 60 cycle, single-phase electric
current. The installation must comply and be grounded in accordance with the National Board of
Fire Underwriters and National Electric Code ANSI/NFPA No. 70-1987 (or the latest addition).
All applicable local codes should be followed as well.
Installation wiring should be wired through each limit control or interlock, while operating
controls (like the thermostat) should be treated as 24-Volt wiring. The burner has its own 24 Volt
AC power supply. Do not add a 24 Volt AC transformer for the burner wiring. Do not use the 24
Volt transformer found on the burner to power other items in the heating system, such spill
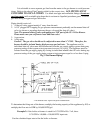
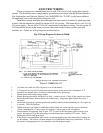
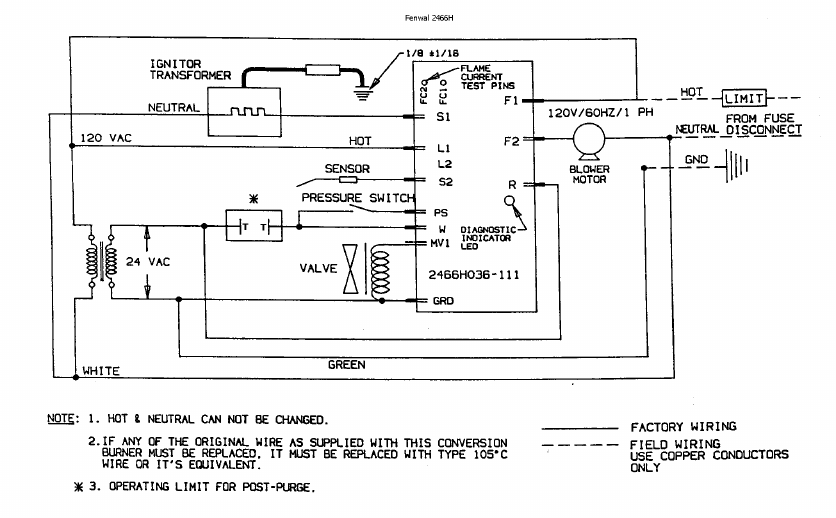
switches, etc. Follow the wiring diagrams provided below:
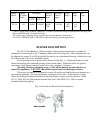
Fig. 4 Wiring Diagram for Fenwal 2466H
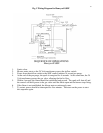
SEQUENCE OF OPERATIONS
Fenwal 2466H 036-111
1. All limits are closed and 120-volt power is on for the burner.
2. T-T terminals are closed (24-volt power carrying lines; do not power this.) Sometimes, T-T
terminals are jumped with a wire nut for burners not set for post-purge.
3. Burner motor starts and pre-purge begins
4. Burner housing pressurizes and proves air flow - contacts closed. {Note: if the contacts are closed
before the motor starts, blower motor runs continuously. Diagnostic light flashes once every 3
seconds.}
5. At the end of pre-purge, ignition spark starts (audible sound) and the redundant gas valve opens for
4 seconds. (Trial for ignition)
6. Within 4 seconds, gas flame is established and the flame rod carries current to prove the flame
{Note: a minimum of 0.7 micro amps are required; 5 micro amps is not uncommon.}
7. Flame remains till operating limit is open. If T-T is used to fire the burner (field wired for post-
purge), the burner will go into post-purge once the thermostat is satisfied (T-T open). These
burners have 60 seconds post purge.
8. If the flame is not established, the control will attempt ignition two more times before locking out
for 60 minutes. The control will then attempt to re-establish the flame every 60 minutes. To reset
the control, interrupt power for five minutes to start the sequence again.