


ASSEMBLY INSTRUCTIONS
NOTE: It is recommended by the manufacturer that a qualified individual install this appliance.
Your new DiamondGlo heater is shipped in one box and the logs are shipped in a separate box. Packed
with the DiamondGlo heater is a thermostat that must be hooked to the appliance before it is operated.
Please follow the instructions on page 7 for the installation of this thermostat.
1. Remove DiamondGlo heater from the box by cutting bands around the box and lifting the box off
the heater.
2. Lift heater from the bottom of the box and place near the final location of the heater. CAUTION:
Lift heater when moving. Do not slide heater on the floor.
3. Locate thermostat that was packaged with the heater and see instructions on page 7 of these
instructions for installation of the thermostat.
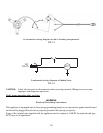
4. The manufacturer has furnished a 3/8” flare brass fitting for connection to the gas line. If the gas
line is anything but a 3/8” flare connection, this fitting must be changed to the appropriate fitting by
the installer.
5. Connect the gas line to the fitting located at the back of the heater.
6. Remove the screen from the front of the heater by removing the screw from the middle top of the
screen, and pulling the screen off by pulling on the two brass knobs located on the bottom of the
screen.
7. Place the heater in its final location.
8. Make sure all gas connections are tight. Turn on gas and coat each joint with a soap and water
solution and watch for air bubbles which will indicate leaks. Any leaks must be corrected before
proceeding with installation. DO NOT USE A FLAME OR ANY IGNITION SOUR
CE TO
CHECK FOR LEAKS.
9. Your DiamondGlo heater was leak tested before it left the factory, but it is recommended to check
all connections for leaks.
10. Remove logs from box. Notice the notches in the larger logs and the numbers on the bottom of the
same logs. The log placement is very important to the safe operation of the appliance.
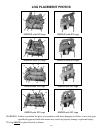
11. NOTE: For correct log placement, match the log placement photo in this manual with the model number
of your heater. The logs MUST be placed exactly as shown. If there is any evidence of carbon or blackening
on the logs, they may be incorrectly placed. There should not be any carbon or blackening on the logs at
any time.
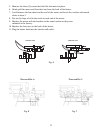
12. Place the back log in the grooves on the elevated cradle toward the back of the grate making sure
the grooves in the bottom of the log fit on the cradle.
13. Place the middle log in the grooves on the center elevated section of the cradle making sure the
grooves in the bottom of the log fit on the cradle. This will position the middle log between the
burner.
14. Place the front log on the front of the grate in front of the cradle making sure the grooves on the
bottom and front of the log fit the bars on the grate.
15. Place the small top logs in the grooves on top of the front and back log, making sure these logs lay
across the middle log in the appropriate groove.
16. Match the model number of your heater with the heater model number on page 12 of this
instruction manual. The log placement should look like this. If it doesn’t, follow steps 10 through 16
above.
17. Replace the front screen on the heater by sliding the two sides into the notches and replacing the
screw in the top middle of the screen.
6