


CLEANING AND MAINTENANCE INSTRUCTIONS
ALWAYS REMEMBER:
1. Do not place any combustible material near the appliance.
2. Do not place any paper, trash or other material on the log set or in the heater.
3. Do not touch any part of the appliance when the unit is in operation.
Your heater is designed to be virtually maintenance free, although periodic visual inspection and
cleaning is required. Follow the instructions below for the correct procedures.
If at any time the flames on your log set look abnormal or an odor is noticed that coming from the
appliance, contact a qualified service technician or the gas company.
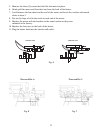
Periodically, visually inspect the main burner flames as well as the pilot flame. The appearance of these
flames should resemble the drawings on page 11 (FIG. 5 and FIG. 6 or FIG. 7). Any measurements are
approximate. Flame heights may vary.
To ensure that your unit operates at peak performance, inspect and clean it at least monthly during the
heating season by following the guidelines below. More frequent cleaning may be required due to
excessive lint from carpeting, bedding material, etc. It is imperative that control compartments, burners
and circulating air passageways of the appliance be kept clean.
CAUTION: Before cleaning the appliance, be sure it is turned completely off. The pilot should also be
turned off. The unit must be completely cooled.
DO NOT USE ANY CLEANING FLUIDS OR TOOLS FOR CLEANING PURPOSES
1. Remove front screen.
2. Remove logs from front assembly and place on the floor close to the heater.
3. Lightly vacuum any loose particles or dust from the grate and burner. Pay close attention to the air
opening at the beginning of the main burner. This opening is located at the point of the main burner
where the gas line from the control valve is attached. This opening must remain free of any
obstruction.
4. Lightly vacuum any loose particles or dust from the pilot flame area, being sure not to touch any part
of the pilot with the vacuum.
5. Lightly vacuum any dust from the logs.
6. Carefully replace logs on the grate assembly and relight the pilot as stated in this instruction manual.
NOTE: If any of the appliance parts are hit with the vacuum during cleaning, a gas leak could occur. If
this happens, be sure to check for leaks as described on page 6 of this instruction manual.
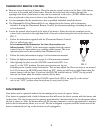
FAN MOTOR LUBRICATION
១
It is recommended by the manufacturer that the fan motor be re-lubricated every six (6)
months.
១
Use six (6) drops of a #20 non-detergent oil when re-lubricating.
1. Unplug the heater from the electric wall outlet.
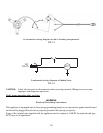
2. Remove the fan cover from the back of the heater.
3. While looking at the back of the heater, notice the notch that is punched in the end of the
motor at the 2 o’clock position. This notch is also punched at the other end of the motor in
the same position.
4. Notice the location of the motor brackets, because the motor must be re-installed exactly as
you remove it.
10