


Heat & Glo LifeStyles Collection • Montana • 4039-150 Rev I • 08/06
19
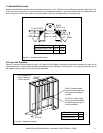
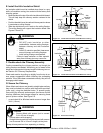
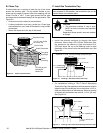
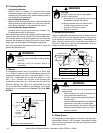
Figure 6.1 Ceiling/Attic Construction
Fire Risk
• Must maintain 2 in. air (51 mm) clearance
to insulation and other combustible
materials.
WARNING
6
6
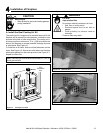
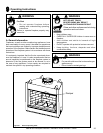
Complete the Enclosure
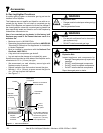
A. Chimney Termination
Chimney Termination Requirements
• Must have a cap approved and listed for this fi replace
system
• Must not be located where it will become plugged by snow
or other material
• Must terminate at least 3 ft (914 mm) above the roof and
at least 2 ft (610 mm) above any portion of the roof within
10 ft (3.05 m),
• Must be located away from trees or other structures
Mark the Exit Point of the Roof
Locate the point where the chimney will exit the roof by
plumbing down to the center of the chimney. Drive a nail
up through the roof to mark the center. See Figure 6.1.
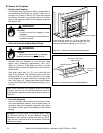
Cut Out the Hole in the Roof
Measure to either side of the nail and mark the 14-1/2 in.
x 14-1/2 in. (368 mm x 368 mm) opening required. This
is measured on the horizontal; actual length may be larg-
er depending on the pitch of the roof. Cut out and frame
the opening. See Chapter 25 of the Uniform Building
Code for roof framing details.
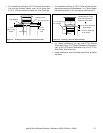
Assemble the Chimney Sections Through the
Roof
Continue to add chimney sections through the roof open-
ing, maintaining at least a 2 in. (51 mm) air space to com-
bustible materials.
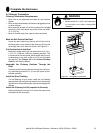
Install the Roof Flashing
If a roof fl ashing is to be used, install the roof fl ashing
appropriate to the roof pitch and install a round termination
cap and storm collar following the instructions shipped with
the cap.
Install the Chimney Air Kit (required in Canada):
When installing the chimney air kit, follow the instructions
provided with this accessory.