


HearthStone Quality Home Heating Products Inc TUCSON Gas-Fired Direct-Vent
34
10. Shut the gas control valve access door.
11. Plug in the fan accessory, if so equipped.
12. If T’stat was selected, set thermostat to
“ON” and set desired temperature
setting. Normally, if T’stat position was
selected, the main burner is cycled on
and off by the thermostat or the “on/off”
switch located on the bottom of the
thermostat body.
NOTE: When pressing/clicking the
piezoelectric spark ignition button to light
the pilot, watch through the glass (front) of
the unit. Click the ignitor button until a
flame is visible at the pilot. Once the pilot is
lit, continue to press on the gas control knob
for another 20 seconds, then release.
Ascertain that the pilot is still lit by looking
through the front door. If lit, then turn the
gas control knob fully counter-clockwise to
the “ON” position. If the pilot fails to light,
or if it went out due to a premature release
of the gas control knob while pressed in the
“PILOT” position, wait 60 seconds for the
Interlock to release. Then repeat the lighting
process as described in this section of the
manual.
Once the pilot has been lit, the gas control
knob has been turned to the “ON” position,
and the ON/OFF/T’stat switch has been
turned to “ON”, the main burners should
light immediately. If you would like to use
the thermostat and it has been installed,
switch the ON/OFF/T’stat switch to
thermostat. Turn the thermostat to "ON" and
set it to a higher position so that it "calls" for
heat in order to turn light the main burners
(i.e. turns the unit on). Note that the
thermostat controls the on/off cycling of the
main burners, but the pilot remains lit
regardless of the thermostat setting. The
only way to turn the pilot off is to turn the
gas control knob fully clockwise to the
“OFF” position.
TO TURN OFF GAS TO APPLIANCE
1. Set the thermostat to the “OFF”
position or turn the ON/OFF/T-
STAT switch to the “OFF”
position.
2. If shutting the unit off for the
non-heating season, turn the gas
control knob fully clockwise to
the “OFF” position. Do not force
the knob to turn.
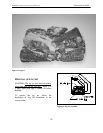
AIR SHUTTER ADJUSTMENTS
The air shutter is adjustable while the stove
is burning by loosening the adjusting nut
located under the rear right hand corner of
the stove. This nut is hot and should not be
touched. Use only metal tools for this
adjustment.
Moving the nut toward the front of the stove
increases the air and moving the nut toward
the back of the stove decreases the air.
Tighten the nut after making adjustment.
The air shutter is factory set and only a
qualified gas technician should make
adjustments.
Note: Very little movement is needed to
substantially change the burn and flame
patterns.
Some conditions cannot be corrected
through air shutter adjustment; an
adjustment must be made to the gas supply
pressure. Supply line/manifold gas line
pressure adjustments must be performed by
qualified service personnel. Do not attempt
to complete any part of the installation or
adjustment of this unit unless technically
qualified to do so.