


HearthStone Quality Home Heating Products Inc TUCSON Gas-Fired Direct-Vent
32
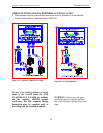
PILOT LIGHT WARNING
The Tucson has a piezoelectric spark igniter
(the push button located next to the gas
control valve behind the valve access door),
which ignites the pilot light by means of a
spark at the pilot light assembly. Do not
attempt to light the unit with a match or by
any means than the piezoelectric spark.
PREPARE FOR LIGHTING
Prepare for the lighting procedure by
adjusting the thermostat (if equipped) to its
lowest setting or OFF position. If the gas
control knob is not in the OFF position, turn
the knob fully clockwise to OFF. Locate the
variable output control knob and turn it fully
clockwise to the highest setting.
Prior to lighting the unit for the first time,
wait 5 minutes to allow any residual gas
within the unit to dissipate. Smell all around
the appliance area for gas. Be sure to smell
next to the floor because some gases are
heavier than air and will settle on the floor.
If you do not smell gas after this five-minute
period, proceed with the lighting procedure.
If you do smell gas, DO NOT proceed with
the lighting procedure. Instead, immediately
refer to the What To Do If You Smell Gas
Warning, on the cover of this manual.
WARNING: The valve control has an
interlock device. After shutting off all gas
flow, the pilot burner cannot be relit until
the thermocouple has cooled, allowing the
electromagnet to be released (approx. 60
seconds). The gas control knob is designed
to be operated by hand. Do not use any tools
during this operation. Damaged knobs may
result in serious injury.
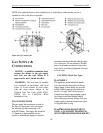
INITIAL ADJUSTMENTS
Once the Tucson has been set in place,
connected and assembled as described in the
Clearances To Combustibles, Venting
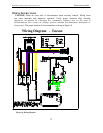
Components & Configurations, Electrical
Connections, And Gas Supply and
Connections sections of this manual, the unit
is almost ready to be lit for the first time.
The manufacturer tests each unit prior to
shipment, so ignition should take place
without failure. However, a number of small
adjustments may be necessary to
compensate for variations in gas pressure,
altitude, and other factors particular to each
installation.
VARIABLE OUTPUT CONTROL
The gas control valve is equipped with a
variable output control. This control varies
the rate of heat produced by the unit by
varying the gas pressure to the main burner
tube. A combination of heat output and the
thermostat setting affect the length of the
burn cycle. If your stove turns on and off too
often, try, first, reducing the burn cycle by
turning the HI/LOW knob, on the control
valve, to a lower setting. Using the variable
output control, the heat output of the unit
can be reduced for mild fall and spring
months, or maximized for the colder winter
months. This adjustment can be made, by
the homeowner, as necessary by turning the
variable output control knob to “HI”, “LO”
or any setting in between.
AIR SHUTTER
The air shutter is used to regulate the air-to-
gas combustion mixture, which in turn
influences the size and color of the flames.
The air shutter has been positioned in the
general location needed for the type of gas
being used, however, if the unit is not
burning as well as it should, then the air
shutter may need adjusting. The air shutter
may need adjustment once the unit has been
installed to compensate for variations in
supply line pressure, restriction plate
position, altitude, gas type conversions, and
other variables.