


September 1, 2008
September 1, 2008
Heat & Glo • NorthStar EPA Fireplace • 480-1081C
Page 27
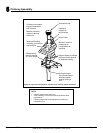
NAIL
FLASHING
PLATE
CHIMNEY
THIMBLE
EXTENSION
SCREW
FLASHING
THIMBLE
ADJUSTABLE
EXTENSION
HOLES
FLASHING
CHIMNEY
FLASHING
PLATE
NAIL
THIMBLE
SCREW
THIMBLE
EXTENSION
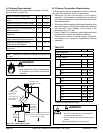
B.
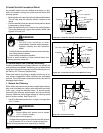
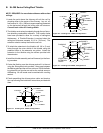
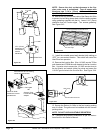
SL-300 Series Ceiling/Roof Thimble
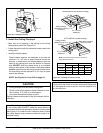
1. Locate the point where the chimney will exit the roof by
plumbing down to the center of the chimney. Lay out, cut
andframea14-1/2in.(368mm)squareopening(measured
on the horizontal) through the ceiling and roof structure.
Consult local codes for framing details.
2. The thimble must extend completely through the roof struc-
ture shielding combustible materials. Five location holes
havebeenprovidedto allowforavarietyofceiling/roof
thicknesses. A Thimble Extension is required when the
ceiling/roofthicknessexceeds12-1/2in.(318mm).The
extension should overlap the thimble one inch.
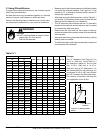
3.Toattachtheextensiontothethimble,drill1/8in.(3mm)
holes through the outer shield of the thimble using the
predrilled holes in the extension as guides. Attach the
extension to the thimble using the screws provided with
the extension.
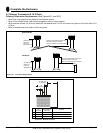
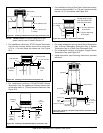
4. Install the thimble assembly and nail it securely to the fram-
ing members.
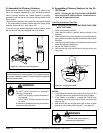
5.Centertheashingoverthechimneyandnailittotheroof
using the Stormguard nails provided. Keep gaps between
theashingplateandtherooftoaminimum.Caulktheash-
ing plate and roof junction as well as the vertical seam on
theashing.Allnailheadsmustbecaulkedwitharoong
sealant.
6. Finish assembling the chimney storm collar and termina-
tion cap following the installation instructions provided with
them.
CHIMNEY
FLASHING
PLATE
JOISTS
NAIL
THIMBLE
FLASHING
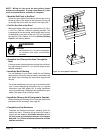
Figure 27.1 Installing Part: 12966A, Conguration 1
Figure 27.2 Installing Part 12966A, Conguration 2
Figure 27.3 Installing Part 12966A, Conguration 3
NOTE: REQUIRED for manufactured homes with vaulted
ceilings.