


September 1, 2008
September 1, 2008
Heat & Glo • NorthStar EPA Fireplace • 480-1081C
Page 23
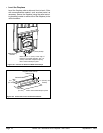
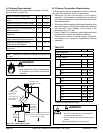
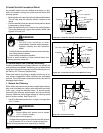
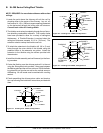
F. Install the Ceiling Firestops
• Mark andcutanopeningintheceilingfortheceiling
restopbeingused.SeeFigure23.2.
• Frame the opening with the same size lumber used in the
ceiling joists.
• Installtherestopspacer.
Theserestopspacers aredesigned toprovide the
minimum 2 in. (51 mm) air space required around the
chimney. In all situations,therestopspacersaretobe
nailedtotheceilingjoistsfromthebottomorreplace
side, EXCEPT when the space above is an insulated
ceilingoratticspace.Inthissituation,therestopspacer
must be nailed from the top side to prevent loose insula-
tion from falling into the required 2 in. (51 mm) air space
around the chimney.
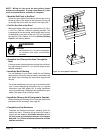
NOTE: See Figures 24.1 and 24.2 on page 24.
Note: TheceilingrestopMUSTbenailedtothebottom
of the ceiling joists EXCEPT when the space above is
uninsulated and the attic insulation shield is not being used
(see Figure 23.2). When the attic insulation shield is used
theceilingrestopmaybeaboveorbelowthejoistofan
insulated ceiling.
Note: You must provide support for the pipe during
construction and check to be sure inadvertent loading has
notdislodgedthechimneysectionfromthereplaceorat
any chimney joint.
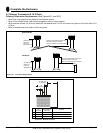
• Ceilingrestopsmustbeusedatceiling/oor.
• Chaseconstructionrequiresceilingrestopsateach
oororevery10ft(3.05m)ofclearspace.
• Use same dimensional lumber as joists.
Ceilingrestopslowsspreadofreandreducescoldair
inltration.
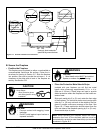
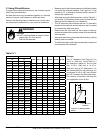
CAUTION
ROOM ABOVE (non-insulated ceiling)
ATTIC ABOVE (insulated ceiling)
B
A
Ceilng firestop
attached to bottom
of framing
Ceiling firestop
attached to top of
framing
When attic insulation
shield not used
Note: Use same dimensional lumber for framing
ceiling firestop and joists.
2 in. (51mm)
clearance
2 in. (51mm)
clearance
Figure 23.2 Installing the Ceiling Firestop
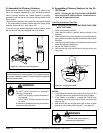
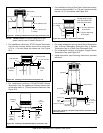
Catalog #
A B
in. mm in. mm
FS338
14-1/2 368 14-1/2 368
FS339
14-1/2 368 18-3/8 467
FS340
14-1/2 368 23 584
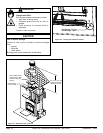
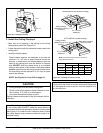
Wire Ties
Wire Ties
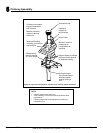
4" Flex
Figure 23.1 Installing Flex Pipe