


30
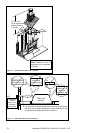
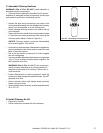
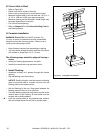
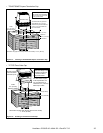
Figure 8.9 Ceiling/Attic Construction
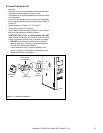
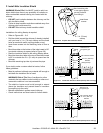
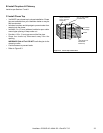
H. Complete Installation
WARNING! Risk of Fire! You MUST maintain 2 in.
(51 mm) air space to insulation and other combustible
materials around the chimney system. Failure to do so
could cause overheating and re.
• Keep chimney sections from separating or twisting.
• You may secure straight chimney sections at the joints
with screws no longer than 1/2 in. (13 mm).
The following steps should be skipped if using a
chase.
• Install roof ashing appropriate to roof pitch.
• Install round termination cap and storm collar.
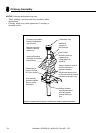
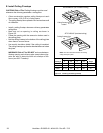
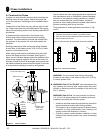
I. Install Flashing
• Assemble chimney so it passes through the framed
opening.
• Slip the ashing over the chimney.
NOTICE: Roong shingles must be below the ashing
plate on the lower side of a sloped roof and over the
ashing plate on the sides and top.
• Nail the ashing to the roof. Keep gaps between the
ashing plate and the roof to a minimum.
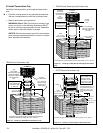
• Caulk the ashing plate and roof junction as well as the
vertical seam on the ashing. All nail heads must be
caulked with a roong sealant.
• Caulk the overlap seam of any exposed pipe sections
that are located above the roof line to prevent leaks.
Heatilator • EL36/EL42 • 4044-132 • Rev AD • 7/12
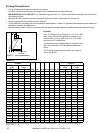
G. Cut out Hole in Roof
• Refer to Figure 8.9.
• Plumb from roof to center of chimney.
• Drive a nail up through roof to mark center of pipe.
• Measure to either side of nail and mark the 14-1/2 in. x
14-1/2 in. (368 mm x 368 mm) opening required.
• Measure opening on the horizontal; actual length may
be larger depending on roof pitch.
• Cut out and frame opening.
• Refer to Chapter 25 of the Uniform Building Code for
roof framing details.