


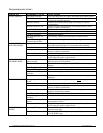

HearthStone Quality Home Heating Products, Inc ® Equinox Model 8000
20
Maintaining Your Equinox Wood Stove
NOTE: ANY SYMPTOMS OF OVER-FIRING
WILL VOID YOUR WARRANTY!
CREOSOTE FORMATION AND NEED FOR REMOVAL
When wood burns slowly at low temperatures, it produces tar
and other organic vapors, which combine with expelled
moisture to form creosote. These creosote vapors condense
in the relatively cool chimney flue of a slow-burning fire. As
a result, creosote residue accumulates on the flue lining.
When ignited, this creosote makes an extremely hot fire,
which may damage the chimney or even destroy the house.
When burning wood, inspect the chimney connector and
chimney at least once every two months during the heating
season to determine if there is a creosote buildup.
To prevent the buildup of creosote:
Burn the stove with the primary air control fully open for 35
- 45 minutes daily to burn out creosote deposits from within
the stove and the venting system.
After reloading with wood, burn the stove with the primary
air control fully open for 20 to 30 minutes. This manner of
operation ensures early engagement of the secondary
combustion system that minimizes creosote buildup in the
chimney.
If a creosote build-up occurs, inspect the stovepipe connector
and chimney more often, at least monthly during the heating
season to monitor the accumulation. If a creosote residue
greater that 1/4" (6 mm) accumulates, remove it to reduce the
risk of a chimney fire.
If your glass always remains dirty, your operating
temperatures are too low or your wood is wet; therefore,
there is a higher risk of creosote buildup.
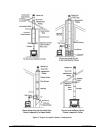
Inspect the venting system at the stove connection and at the
chimney top. Cooler surfaces tend to build creosote deposits
faster, so it is important to check the chimney at the top
(where it is coolest) as well as from the bottom near the
stove.
Remove accumulated creosote with a cleaning brush
specifically designed for the type of chimney in use. Use a
certified chimney sweep to perform this service. Contact
your dealer for the name of a certified chimney sweep in
your area (your dealer may be a certified sweep).
We recommend that before each heating season you have the
entire system professionally inspected, cleaned and repaired,
if necessary.
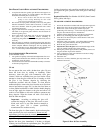
FRONT DOOR REMOVAL PROCEDURE:
1. Open the door 45 to 90 degrees.
2. Remove the front door by lifting it straight up off the
hinges with the hinge pins remaining in the door.
3. It may be necessary to apply considerable upward
pressure on the door while swinging it back and forth
slightly to work the hinge pins out of the bronze
bushings.
4. Take care to avoid scratching the adjacent soapstone
when the hinge pins come free.
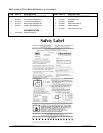
GASKETS
Replace door gasket material every two to three seasons,
depending on stove use. If the door seal leaks, a new gasket
will ensure a tight seal and improve stove performance.
We recommend you only use HearthStone replacement
gaskets and adhesive when you need to replace your door
gasket. Contact your dealer for a gasket kit that includes
instructions, adhesive, and the gasket for your stove.
Required Door Gasket: Part Number: 3110-051, 68”
Length, 1/2" Diameter.
FRONT DOOR GASKET REPLACEMENT
PROCEDURES:
1. To replace the front door gasket, remove the door from the
stove (see door removal instructions above), Pull off the old
rope gasket. Carefully remove any old gasket material and
adhesive with a small screwdriver, or small cold chisel and a
hammer. Clean all gasket channels with a small wire brush if
necessary.
2. Apply a small amount of waterglass (sodium silicate), or a 1/8
inch bead of an approved gasket adhesive into the bottom of
the entire gasket groove.
3. Start at the center of the hinge side of the door and push the
new gasket into place uniformly
without stretching or
compressing the gasket material. Pinch the gasket into place as
necessary.
4. Once the gasket is installed, re-install and close the door
immediately to fully seat the gasket in the channel and ensure
complete adhesion. Waterglass will dry quickly, and does not
require heat to cure. Other adhesives may need heat to cure –
so follow the product manufacturer’s instructions.
5. Check the gasket seal using a dollar bill. Place the bill in
various locations around the door. Close the door and remove
the bill by pulling it out. If the bill slides out without
resistance, the seal will leak. If the bill does not slide out, the
door is too tight, and the gasket will wear quickly. If the test
reveals varying results in different locations – the gasket may
not be installed uniformly, or too much adhesive was used.
6. First, adjust the gasket as necessary by reseating it uniformly.
If that does not work, adjust the latch mechanism so it applies
more or less pressure when the door is closed.