


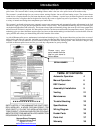


11
Installation
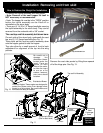
IMPORTANT: The mounting frame/surround
assembly and flue piping is the most critical part of
the installation and must be done correctly and installed
securely.
1. Choose the chimney configuration that is best suited
for the installation. See venting section.
• Note: If 100% outside air is desired or required, the
outside air option will need to be installed on the stoves
body. (See instructions included with outside air kit
(part #1-00-674080.) See Page 20.
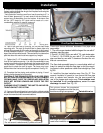
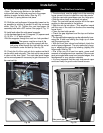
2. Make sure the unit will fit into the fireplace opening.
See Fig # 17. When installing in smaller fireplaces,
test fit the mounting frame into the firebox. Note: The
unit overhangs to the rear.
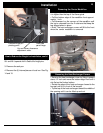
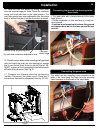
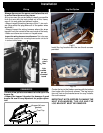
3. Install the 3 piece cast surround set to the sides
and top of the mounting frame with the bolts and nuts
supplied. The left and right side should be done before
the center section is installed. Make sure the bolts
are loose. Do not remove the side panel hinges. The
left and right side wings should be standing up aligned
with the side of the mounting frame and slid inward
towards the center. Note:The wings mount on the rear
side below the notch and on the front side above the
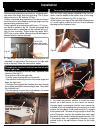
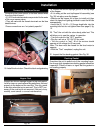
notch. See Fig. 16 & 18. Slide the cast ash lip onto
the frame and check to make sure it can go against
the roped frame rails and fits into the pockets on the
left and right cast sides. See Fig. 19.
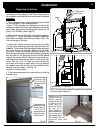
Install the center section.
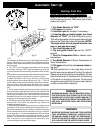
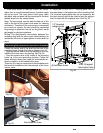
Beginning Installation
3" Outside Air
starter collar
NOTE: The stove body extends through the mounting frame
in the rear approximately 2".
Approximately 2" overhang
Fig. 16
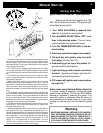
Fig. 17
Notch
Cast in front of
the frame. Use
(1)1/4-20 x 3/8
flange bolt from
the rear.
Cast behind the
mounting frame
flange. Use (2)
1 / 4 - 2 0 x 5 / 8
flange bolts and
nuts with bolts
from the front.
Fig. 18
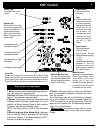
Slide the ash lip
casting into the
frame, making
certain the ash lip
is sitting on the
slide rails on
either side. With
the ash lip in
place, adjust the
surround sides so
there is an even
gap where the ash
lip extends into the
surround side and
tighten.
Fig. 19
Ash lip slide rails
4. If the wing extensions are required they should be
installed next.
Evaluation notes were added to the output document. To get rid of these notes, please order your copy of ePrint IV now.