


Operation
Operation
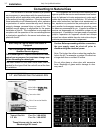
HOW TO LIGHT THE FIRE
1. STOP! Read the safety information on the front
cover.
2. If using the optional thermostat, set thermostat to
the lowest setting.
3. Turn off electric power to the appliance.
4. Turn the ON-OFF/THERMOSTAT switch to the OFF
position.
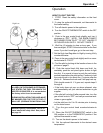
5. Push in the gas control knob slightly and turn it
clockwise to “OFF.” NOTE: THE KNOB CANNOT
BE TURNED FROM “PILOT” TO “OFF” UNLESS IT
IS PUSHED IN SLIGHTLY. DO NOT FORCE IT.
6. Wait five (5) minutes to clear out any gas. If you
then smell gas, STOP! Follow instructions on the front
cover. If you don’t smell gas, go to the next step.
7. Set the High-Low Regulator to High by turning it fully
counterclockwise.
8. Press in the gas control knob slightly and turn coun-
terclockwise to “PILOT.”
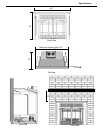
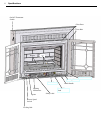
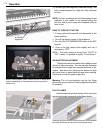
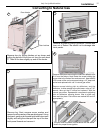
9. Find the pilot by looking at the location shown in the
picture on page 8.
10. Push the control knob fully down and hold. Im-
mediately push the red piezo ignitor button to light
the pilot. It is normal to have to push the red button
several times before the pilot ignites. Continue to hold
the control knob in for about one (1) minute after the
pilot is lit. Release the knob and it will pop back up.
Pilot should remain lit. If it goes out, repeat steps 5
through 9.
• If the knob does not pop up when released, stop
and immediately call your service technician or gas
supplier.
• If the pilot will not stay lit after several tries, turn the
gas control knob to “OFF” and call your service tech-
nician or gas supplier.
• Let the pilot burn for 5 to 10 minutes prior to turning
on the main burner.
11. Turn the gas control knob counterclockwise to
“ON.”
12. Place the ON-OFF/THERMOSTAT switch in the
ON position or in the THERMOSTAT position if the
optional thermostat is used.
13. Turn on the electric power to the heater.
14. Set the optional thermostat to the desired room
temperature.
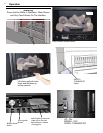
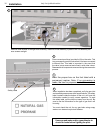
High-Low
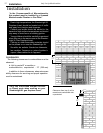
A LABEL ON THE BURNER SYSTEM MOD-
ULE STATES THE FUEL FOR WHICH THE
HEATER IS EQUIPPED. It is not marked at
the factory since it can be converted.
DURING INSTALLATION THIS LABEL MUST
BE MARKED FOR THE TYPE OF FUEL IT
WILL USE. (PROPANE OR NATURAL GAS)
Detailed lighting instructions can be lo-
cated above the safety label. See picture
on page 16.
9