


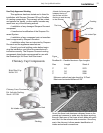

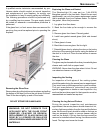

Installation
Only For Qualified Installers
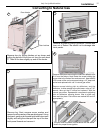
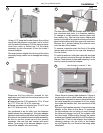
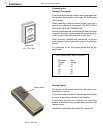
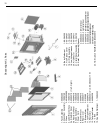
Install the face doors by hanging them on the hinges.
Note: a brass washer goes between the hinges. The
finished installation should look like this.
Installation Check List
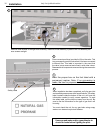
1. Verify unit is assembled for correct gas application. If
not, install conversion kit available from Harman Stove
Company.
2 Make sure gas line is installed in the fireplace to a
point that it can be reached during installation.
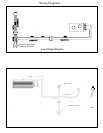
3. Install inlet and vent pipes into chimney.
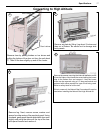
4. Remove glass door by pulling out on the two latches
at the bottom of the door. Then lift up and out on the
door.
5. Remove flex pipe adapter from the stove body if
there is not enough clearance to do the connection as-
sembled.
6. Protect hearth with drop cloth or cardboard.
7. Install flue restrictor if needed
8. Connect flex pipes to pipe adapter, and if removed,
connect adapter to stove body. Keep marked flex liner
to the exhaust side.
9. Reinstall all components that were removed if the
pipe adapter was removed from the stove body.
10. Connect Gas line to the unit. Check for leaks using
an approved method.
11. Change power cord to opposite side of unit if de-
sired.
12. Install log, rock wool and glass door
13. Install Face assembly and adjust to opening.
14. Install chimney cap and mounting adapter
15. Check for leaks, then verify correct operation of
stove.
Brass Washer
13
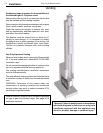
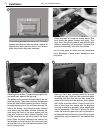
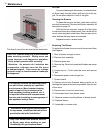
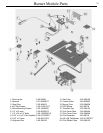
Finish installing chimney cap. Secure flex pipes
to cap base using screws, be sure to connect the
painted flex pipe for exhaust to the proper side on the
base. Now secure base to the chimney using screws,
silicone, a combination of the two, or another approved
method.
14
The appliance must be electrically connected and
grounded in accordance with local codes or, in the
absence of local codes, with the current NFPA 70
National Electric Code or CSA C22.1-Canadian
Electrical Code.
“This appliance is equipped with a three prong
(grounded) plug for protection against shock hazard
and should be plugged directly into a properly
grounded three-prong receptacle. DO NOT CUT
OR REMOVE THE GROUNDING PRONG FROM
THE PLUG.”
23