


Page 9SKU 92966
For technical questions, please call 1-800-444-3353.
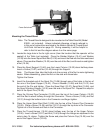
Setup and Adjustment
Caution: To properly break-in your new sewing machine, and
avoid possible damage to the machine, sew at moderate to slow
speeds for the first 15 minutes of use.
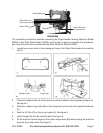
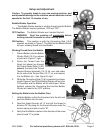
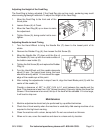
Bobbin Winder Operation
The Bobbin Winder assists in winding thread onto the Bobbin.
The Bobbin Winder has two positions, ‘ON’ and ‘OFF’:
OFF Position The Bobbin Winder won’t contact the belt.
WARNING: Shut the machine off completely before
working around the needle or other moving parts.
ON Position This position is with the Connecting Rod (10-6)
pressed, as shown in Figure C. The Shaft on the Bobbin Winder
will spin; winding thread onto the Bobbin.
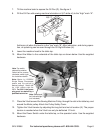
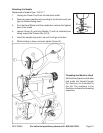
Winding Thread Onto the Bobbin
1. Place a Bobbin onto the Bobbin
Winder Shaft (10-3) as shown
at point d in Figure C, right.
2. Route the Thread from the
Spool (not shown) up through
the Thread Guide Tube (10-39,
point a), the hole in the Thread
Tension Bracket Assembly (10-15, b), over and under
the far side of the Tension Disc (10-17, c), and connect
it to the Bobbin (d). - See Figure D, right.
3. While the Connecting Rod (10-6) is pressed (as shown
in both Figures C and D) the Bobbin Winder will be in the
‘ON’ position and the Bobbin will fill with thread. When
finished, release the Connecting Rod and the Bobbin
Winder will reset to the ‘OFF’ position.
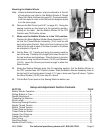
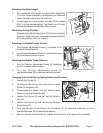
Setting the Bobbin into the Bobbin Case
1. Hold the Bobbin so that the thread exit is to the left, and
push the Bobbin into its case.
2. Feed the thread through slit “A” and pull the thread in
direction “B”. By doing so, the thread will pass under the
tension spring and exit at notch “B”.
3. Verify that the Bobbin rotates in the direction of the arrow
when thread “C” is pulled.
10-6
Figure D
a
b
c
d
c
b
d
Figure C
OFF
Position
ON
Position
10-6
10-6