


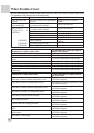

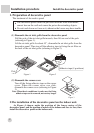

Installation procedure
Install the decorative panel
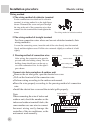
Notice
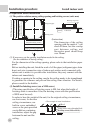
If fastening the screws improperly, it
may cause the trouble as Figure 5 shown.
The screw should be fastened properly.
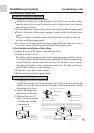
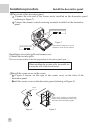
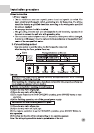
If after fastening the screw, there still is
gap between decorative panel and
ceiling, please readjust the height of the
indoor unit (referring to Figure 6).
If the indoor unit keeps horizontal and the
drain hose is not affected, adjust the height
of the indoor unit through those holes at the
corner of the decorative panel.
Figure 6
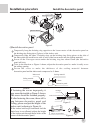
Figure 5
31
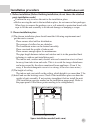
1
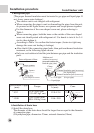
Temporarily hang the hoisting ring opposite to the louver motor of the decorative panel on
the hoisting ring fixing piece (2 pieces) of the indoor unit.
Temporarily hang the other 2 hoisting rings on the hoisting ring fixing pieces at the side of
the indoor unit (be careful not to stick to wire of the louver motor into the sealing material).
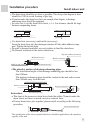
Screw all the 4 hexagon screws under the hoisting ring into about 15mm (the decorative
panel will rise).
Twist in the direction as Figure 4 shown, adjust the decorative panel to make it totally cover
the ceiling opening.
Fasten the screw to make the thickness of the sealing material between
decorative panel and the indoor unit compressed to 5~8mm.
2
3
4
5
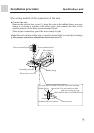
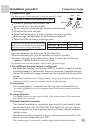
(1)Install decorative panel
Indoor unit
Ceiling material
5~8mm
Decorative panel
Sealing material
Leakage
Leak air from the roof
Pollution
Moist forming and drop
Figure 4
The position of nozzle
4
2
Hoisting ring
1
3
Louver motor
2
Gap is not permitted