


Installation procedure
Install indoor unit
24
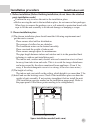
3.Preparation before installation
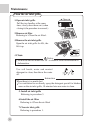
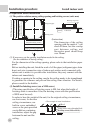
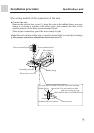
(1) The position relation among ceiling opening and hoisting screws (unit: mm)
(2) If necessary, cut the opening installation needed in the ceiling.
(For the condition of having ceiling)
For the dimension of the ceiling opening, please refer to the installation paper
panel.
Before installing the unit, finish the work of all the pipes (refrigerant pipe, drain
hose) and wire (connection wire of indoor and outdoor unit) connected with
indoor unit to make it is possible after installation, they may connect with the
indoor unit immediately.
If cutting a opening in the ceiling, maybe the ceiling needs to be strengthened
to guarantee its evenness and prevent the ceiling from vibration. For details,
please consult to the builder.
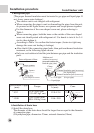
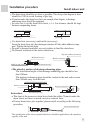
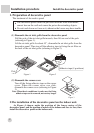
(3) Install the hoisting screw (use a M10 screw)
(The using specification of hoisting screw is M8, but when the height of
hoisting screw is more than 1.0m, the hoisting screw with the specification
of M10 must be used).
In order to bear the weight of the unit, for the original ceiling circumstance,
use foot screw; for the new
ceiling circumstance, use
built-in screw, embedded
screw or the parts provided
on site.Before continuing
installation, adjust the gap
between the unit and the
ceiling.
(Instruction)
The dimension of the ceiling
opening with the mark of * can
reach 910mm, but the overlap
part between ceiling and
decorative panel should keep
over 20mm.
A
950 (Decorative panel)
890*(Ceiling opening)
840 (Indoor unit assembly)
780 (The distance
between hoisting screws)
Refrigerant pipe
Hoisting screw
1340 (Decorative panel)
1280*(Ceiling opening)
840 (Indoor unit assembly)
1070 (The distance
between hoisting screws)
A direction
Over 20
Ceiling
Hoisting angel iron
<The example of actual installation>
Roof
Screw
Long screw nut or threaded bolt
Hoisting screw (M8 or M10)
Ceiling