


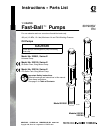
11307906
Service
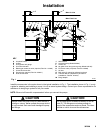
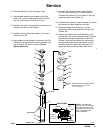
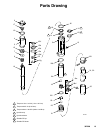
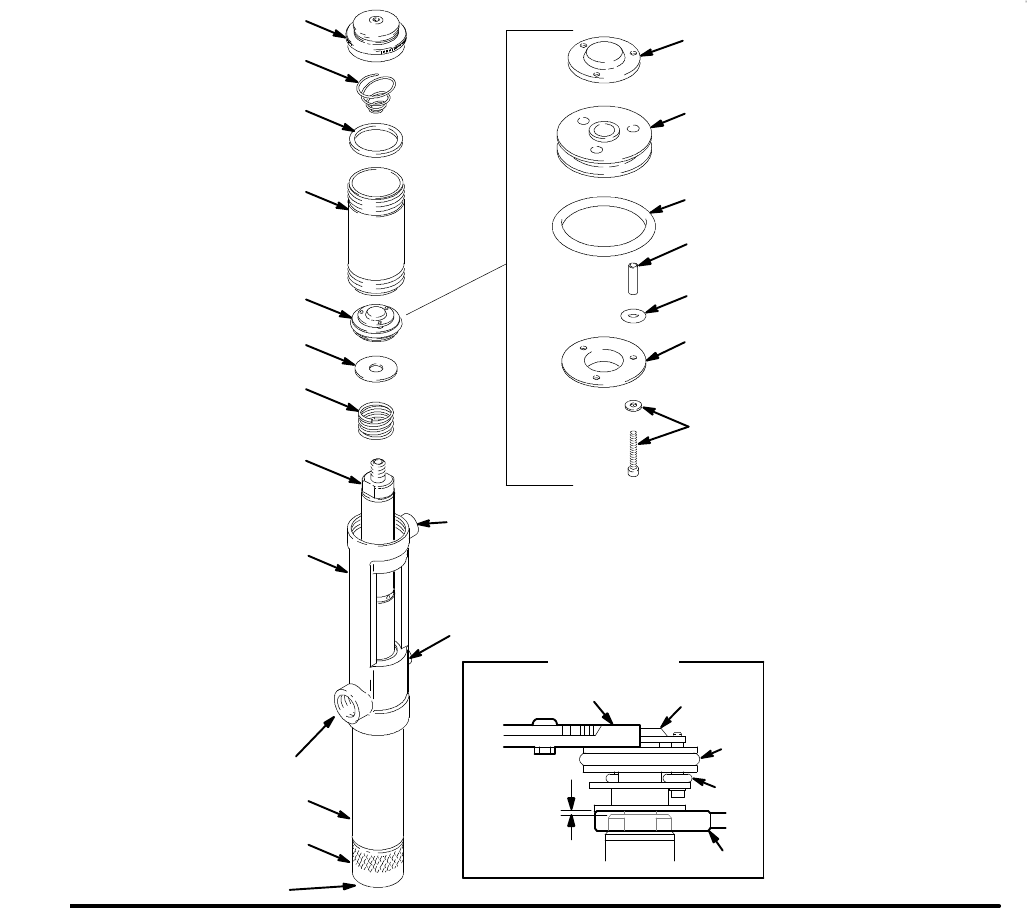
10. Place the ball (18) on the fluid piston (19c).
11. Apply thread sealant to the threads of the fluid
piston (19), screw th e f luid piston onto the pis ton
rod (10), and torque to 23 ft-lb (31.2 N Sm).
12. Install the air motor rod assembly by ins erting it u p
through the bas e from the bottom.
13. Install the spring (8) and the washer (7) o n top of
the piston rod (10).
14. Apply sealant to the threads of the piston rod (10).
Carefully hand tighten the air pis ton assembly (15)
onto the piston rod until it is secure. Do not
tighten with tools.
15. Lubricate t he out side of t he air piston assem-
bly (15). Install t he spring (17) into t he cap (2).
Lubricate t he gasket (6*), and install it in the c ap.
Install the cap on the cylinder (4).
16. Asse mble the cylinder (4) onto the base (5). Screw
the cylinder and base together hand tight.
17. Scre w t he int ake v alve hous ing (21) of t he
assemb led intake valve assembly onto the fluid
cylinder (24).
18. Heavily lubricate the top inside diameter of the
fluid cylinder (24) and the outside threads. Careful-
ly guide t he f luid piston assembly into the fluid
cylinder. Push the fluid c ylinder up, and screw it
into the pump bas e. Use a pipe wrench o n the
knurled part of the intake valve hous ing (21) to
tighten t he f luid cylinder and t he intake valve.
15f
15e
15d
Apply sealant to threads of screw,
and torque to 10 to 14 in-lb
(1.3 to 1.6 N-m).
wrench
pliers
0.032 in.
(0.8 mm)
minimum
Fig. 3
05943B
intake valve
2
4
6*
7
8
17
10
15
5
21
15a*
15b*
15c*
air inlet
fluid outlet
24
13
NOTE: Use pliers and
wrench only for loosening
the piston assembly from
the piston rod. Do not use
them for tightening the
piston assembly.
15g
15a*
15b*
15c*
Piston Detail