


7
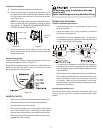
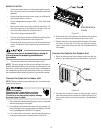
2. Insert tube in flare tool to measurement “A” in chart.
Flare tubing as shown in Figure 19. Make sure flare is
free of burrs and completely formed to make a leak proof
joint.
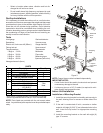
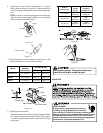
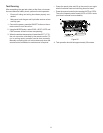
NOTE: In order to avoid dropping burrs into the tubing,
angle the end of the copper tube/pipe in a downward
direction as you remove the burrs.
Pipe
Reamer
Point down
Figure 17
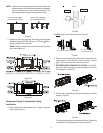
Flare nut
Copper tube
Figure 18
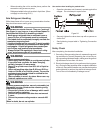
4. Flare Connections: Firmly hold the copper pipe in a die
with the dimensions as in the following table.
Max. Min.
MS* 09 & 12
1/4" (Φ 6.35) 3/64" (1.3) 1/32" (0.7)
MS*09
3/8" (Φ 9.52) 1/16" (1.6) 3/64" (1.0)
MS*12
1/2" (Φ12.7) 1/16" (1.8) 3/64" (1.0)
A (inches & mm)
Outdoor
Diameter
(inches & mm)
Model
Bar
Copper pipe
Clamp handle
Red arrow mark
Cone
Yoke
Handle
Bar
"A"
Figure 19
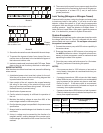
5. Tightening the connection:
• Align the center of the pipes and finger-tighten the flare
nut. Using a spanner and torque wrench (Figures 20 &
21) continue tightening the flare nut until the nut is firmly
on the pipe.
1/4" (Φ 6.35)
1500
(153kgf.cm)
1600
(163kgf.cm)
3/8" (Φ 9.52)
2500
(255kgf.cm)
2500
(265kgf.cm)
1/2" (Φ12.7)
2500
(255kgf.cm)
3600
(367kgf.cm)
Outdoor
Diameter (mm)
Tightening
Torque
(N. cm)
Additional
Tightening
Torque (N. cm)
Figure 20
Figure 21
Do not over-tighten. Excessive torque can
break the nut and/or crimp the pipe.
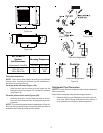
Electrical
HIGH VOLTAGE!
Disconnect ALL power before servicing or
installing this unit. Multiple power sources
may be present. Failure to do so may cause property
damage, personal injury or death due to electric shock.
Wiring must conform with NEC or CEC and all local
codes. Undersized wires could cause poor equipment
performance, equipment damage or fire.