


NOTE:
If the softener is installed in a humid basement or
other damp area, it is better to
fill the tank with less salt,
more frequently.
Eighty to 100 lbs. of salt will last for several
months, depending on water hardness and family size.
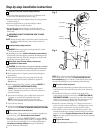
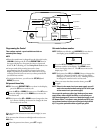
Connect to electrical power:
• Using the instruction sheet provided with the electronic
control, connect the wires from the valve to the electronic
control.
• If transformer wiring is not visible at the back of the
control head, remove control cover.
DO NOT PULL ON OR
DISCONNECT WIRING.
Locate the long wire with U shaped
connectors on one end. Route this wire through the rear
of the control housing. Replace the control cover.
• Fasten the 2 power cable lugs (“U” shaped connectors)
to the 2 screws on the transformer, and tighten the screws.
Then, plug the transformer into the electrical outlet.
• The softener works on 24 volt-60 Hz electric power. The
included transformer changes standard 120 volt AC house
power to 24 volts.
Plug the transformer into a 120 volt outlet
only.
Be sure the outlet is always live so it can not be switched
off by mistake.
Program the control:
• See
Programming the Control
section.
10
9
Step-by-step installation instructions.
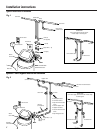
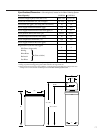
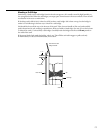
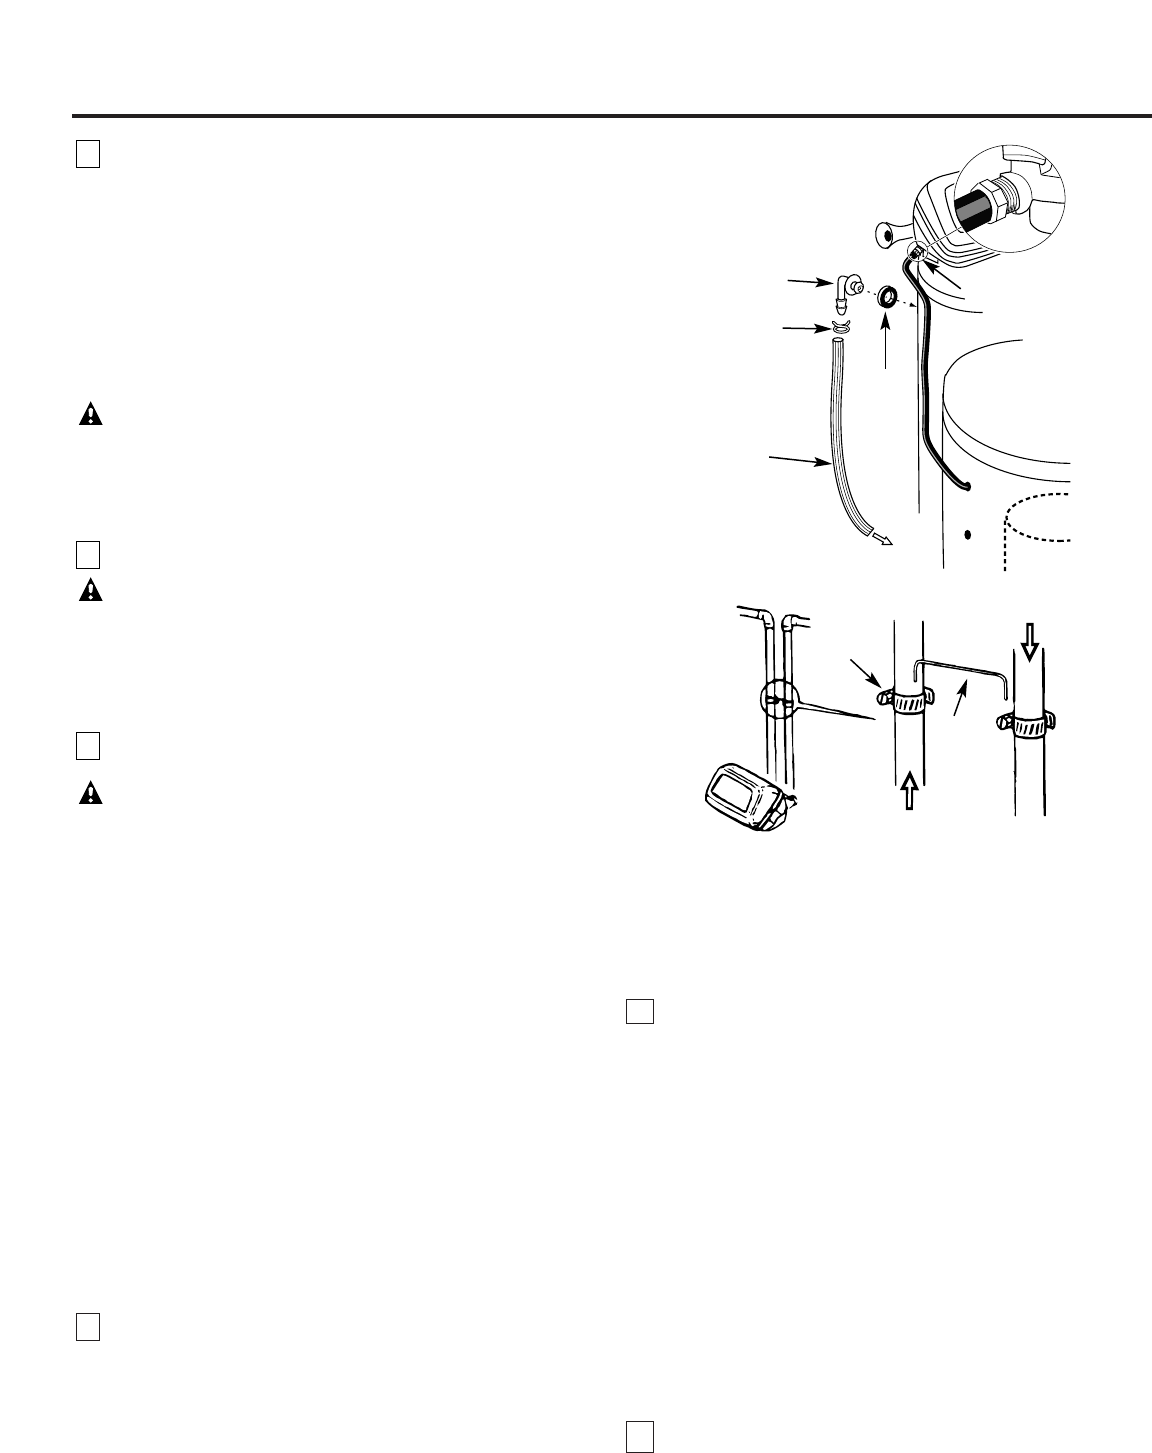
Install the brine tank overflow fittings and hose:
• Insert the rubber grommet into the 3/4″diameter hole
in the brine tank sidewall as shown in Fig. 5.
• Push the end of the hose adapter elbow into the grommet
as shown in Fig. 5.
• Attach a length of hose to the hose adapter elbow.
Use a hose clamp to hold it in place.
•
Locate the other end of the hose at the drain point.
DO NOT ELEVATE
this hose higher than the elbow on the
brine tank.
IMPORTANT: DO NOT TEE OVERFLOW HOSE TO VALVE
DRAIN HOSE.
NOTE:
This drain is for safety only. If the cabinet (brine tank)
should over-fill with water, the excess is carried to
the drain.
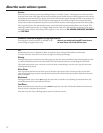
Install grounding clamps and wire:
DANGER:
Failure to properly attach ground wire could
result in electrical shock.
• If plumbing is metal, to
maintain electrical ground continuity
in the house cold water piping, install the included ground
clamps as shown in Fig. 6. Be sure the pipes are clean under
the clamps to assure good contact.
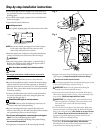
Flush pipes, expel air from softener, and test your
installation for water leaks:
CAUTION: To avoid water or air pressure damage to softener
inner parts, be sure to do the following steps in exact order.
A.
Fully open 2 cold soft water faucets nearby the softener.
B.
Place bypass valve in “bypass” position by pushing the
stem inward.
C.
Fully open the house main water pipe shutoff valve.
Observe a steady flow from both faucets opened in
Step A
above.
D.
Place bypass valve in the “service” position
EXACTLY
as
follows.
KEEP SOFT WATER FAUCETS OPEN.
SLOWLY
pull or slide the valve stem (OUT) toward
“service”, pausing several times to allow the softener to
pressurize slowly.
E.
After about 3 minutes, open a HOT water faucet for
1 minute, or until all air is expelled, then close.
NOTE:
If water appears cloudy or has salty taste,
allow to run for several more minutes or until clear.
F.
Close all water faucets.
G.
Check your plumbing work for leaks and fix right away if
any are found.
BE SURE TO OBSERVE PREVIOUS CAUTIONS.
Add water and salt to the brine tank:
• Lift the cabinet (brine tank) cover. Add about 3 gallons of
water into the tank.
Do not add into the brinewell.
• Fill tank
1
⁄3 to
1
⁄2 full with
NUGGET, PELLET
or coarse
SOLAR
water softener salt with a purity of 99.5% or higher. Do not
use rock, block, granulated, or ice cream-making salts or
salt with iron removing additives
(except for Diamond
Crystal® Red•Out® brand salt.)
8
7
6
5
Fig. 6
Clamp (2)
Ground
wire
From valve outlet
To valve inlet
8
Fig. 5
To sewer drain
Hose clamp
Hose adapter
Grommet
Overflow
drain hose
Brine tank
Venturi nozzle
Brine
well