


www.fmiproducts.com
124979-01C 19
• If control knob does not pop out when
released, contact a qualified service
person or gas supplier for repairs.
Note: If pilot goes out, repeat steps 4
through 8.
8. Slightly push in and turn control knob coun-
terclockwise to the ON position.
9. Set ame adjustment knob to any level
between HI and LO.
10. To leave pilot lit and shut off burners only,
turn control knob clockwise to PILOT posi-
tion. If using optional hand-held remote,
use remote control manual OFF button.
CAUTION: Do not try to ad-
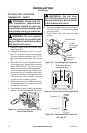
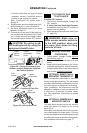
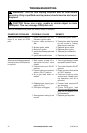
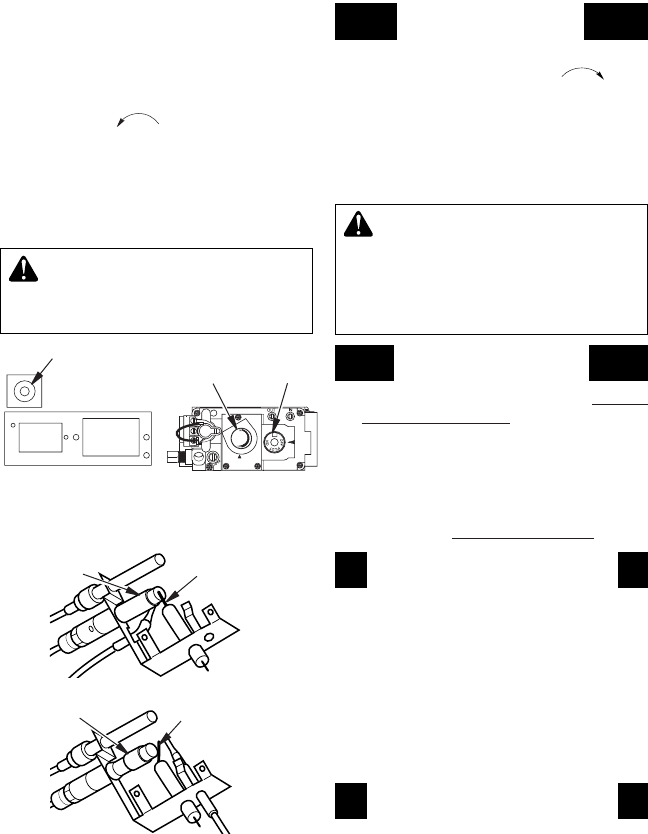
Figure 26 - Control Knob and Ignitor
Button Location (Shown as Supplied -
No Control Options)
Piezo
Ignitor
Button
Control
Knob
Flame
Adjustment
Knob
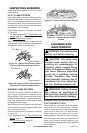
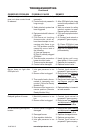
Figure 27 - Propane/LP Gas Pilot
Ignitor
Electrode
Pilot
Burner
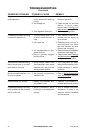
Figure 28 - Natural Gas Pilot
Ignitor
Electrode
Pilot Burner
OPERATION Continued
TO TURN OFF GAS
1. Turn control knob clockwise to the
OFF position.
2.
Set selector switch in the OFF position to
prevent draining battery.
3. Close equipment shutoff valve (see Figure
17, page 15).
WARNING: Make sure re-
mote sensor selector switch is
in the OFF position when you
MANUAL LIGHTING
1. Follow steps 1 through 5 under Lighting
Instructions, page 17.
2. Press control knob and light pilot with
match.
3. Keep control knob pressed in for 30 sec-
onds after lighting pilot. After 30 seconds,
release control knob. Now follow steps 8
and 9 under Lighting Instructions.
MOUNTED THERMOSTAT
Set the temperature adjustment on wall ther-
mostat to the desired setting. The thermostat
has been electronically calibrated at the fac-
tory and requires no adjustment or leveling.
Upon installation, the thermostat must be
allowed to stabilize at room temperature for
a minimum of 30 minutes for proper opera-
tion. See installation instructions on pages
16 and 17.
MOUNTED SWITCH
This wall switch works just like the conven-
tional light switch. Flip switch up for on and
down for off.
Note: Make sure that this switch is not in a posi-
tion to be mistaken for a light switch. This may
result in the replace being inadvertently turned
on without the proper precautions being taken.
See installation instructions on page 17.