


11
How to Assemble the Light Kit (continued)
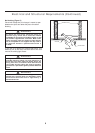
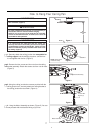
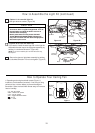
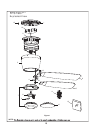
4 (Option A--for use with light kit)
Insert light bulb into socket. (Figure 4A)
CAUTION
To reduce the risk of fire, use 100-watt max. type
T4-minican JD E11 tungsten halogen bulb. Turn off
the wall switch and allow the bulb to cool for 10
minutes before relamping.
Bulb is pressurized and may shatter. DO NOT
TOUCH BULB WITH BARE HANDS. Fingerprints
may result in shorter bulb life. Remove fingerprints
with alcohol prior to use.
Figure 4A Figure 4B
Socket Plate
Light Plate
Assembly
Assembly
Light Bulb
Steel Cap
Assembly
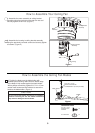
4 (Option B--for use with steel cap)
If you want to install the steel cap and not the light kit.
Assemble the steel cap to the light plate assembly by
twisting in a clockwise direction. (Figure 4B)
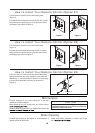
NOTE:
If you have installed your fan with the steel cap,
skip steps 5.
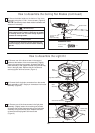
5. Secure the glass to light plate assembly by twisting
in a clockwise direction. Do not over-tighten. (Figure 5)
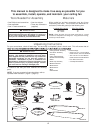
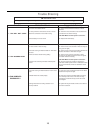
3V, CR2032
BATTERY
2PCS
REMOTE
CONTROL
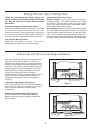
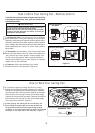
How to Operate Your Ceiling Fan
+L±KLJKIDQVSHHG
0HG±PHGLXPIDQVSHHG
/RZ±ORZIDQVSHHG
5HY±WRJJOHVDLUIORZGLUHFWLRQ
±IDQRII
/LJKW±RQRII
Figure 1
1. Operating and using hand-held remote (Figure 1):
Install two 3-volt batteries (included). If not using for long
periods of time, remove battery to prevent damage to
transmitter. Store the hand-held remote away from excess
heat or humidity.
Light Plate
Assembly
Glass
Figure 5