


WARNING – SERVICING TO BE CARRIED OUT ONLY BY AN AUTHORISED PERSON
Disconnect from electricity before servicing. Check appliance is safe when you have nished.
33
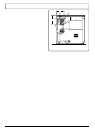
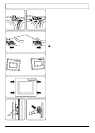
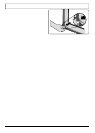
6.7 To Remove the Tall Oven Door
Open the oven door. Supporting the door, remove the
2 screws securing the upper hinge and packing to the
cooker front. Remove the door from the lower hinge by
lifting slightly and moving outwards.
Reassemble in reverse order.
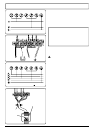
6.8 To Replace the Tall Oven Door Outer Panel
Remove the tall oven door (see 6.7). Lay the door face
down on a suitable surface and remove the 2 screws
from bottom edge of door and the 2 screws from the
inside face of the door.
Remove the outer door panel. Remove the door handle
by unscrewing the 2 screws.
Remove the 2 cross-headed screws holding the door
handle xing bracket to the door panel. Fit the door
handle bracket and the door handle to the new panel.
Fit the panel to the door and reassemble in reverse
order.
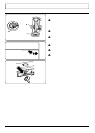
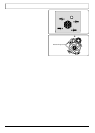
6.9 To Replace the Tall Oven Door Magnetic Latch
Remove the control panel (see 1.1). Remove the plinth
(3 screws) and the central vertical cover (5 screws). Lever
the retaining clip o the magnet unit.
Fit the new unit and retaining clip, and reassemble in
reverse order. Check the door operation.
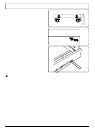
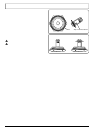
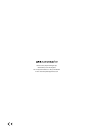
6.10 To Change an Oven Door Seal
Open the oven door. The seal is held in place by small
hooks on the rear face. At the corner, pull the seal
diagonally away from the door centre until that hook
is released (Fig.9-13). Proceed to the next hook and
release it in a similar way, and so on. Use force if the
hooks are sti, as the old seal will be discarded.
When tting the new seal, position the seal join at the
bottom. Hook the new seal in one of the corner holes of
the door, and proceed round the door, snapping in each
hook in turn.
ArtNo.320-0005 Oven door rubber seal
Fig.9-13