


4
14.
Do not allow paint, chemicals or construction dust on or near your unit. Do not allow liquid or
ANY foreign materials on or inside your unit. Shut your unit down and cover it when painting,
construction or similar activity is taking place. Wipe and clean your unit after any construction is
done in your home, or if any foreign material gets on or inside your unit. You may also need to
remove the rear and side cover plates to your unit (unplug unit first) and vacuum and clean the
motors and inside of your unit.
15. Improper gasket maintenance, including failure to replace gaskets, can cause air leaks resulting
in smoke-backs.
16. Remember that, as with any appliance, there is user responsibility involved, including
installation, operation and maintenance of this product. Be sure to check local codes, and call
Technical Support at (800) 245-6489 if you have any questions.
17. Be sure to follow the directions of all manufacturers of third party products that you use,
including exhaust pipe, etc. Never use gasoline, lantern fuel, charcoal lighter fluid, diesel
fuel or any other flammable liquid to start the fire. If you manually start your unit,
recommended fire starter materials are: Wax-impregnated wood chips, cardboard cubes
or firestarter gel designed for pellet stoves (see section on Manually Starting Unit).
Follow any manufacturer’s directions for these products, and NEVER place gel or any
firestarter on any hot surface or hot coals. Never apply any firestarter products of any
kind to a hot surface or hot coals.
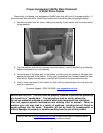
18. Basement Installation: We recommend basement installation be performed only by a
professional installer. For basement installations, a 3” (three inch) pipe and coupler must be
used for Outside Combustion Air, and a minimum clearance of 3’ (three feet) must be
maintained from the ground to the pellet vent exhaust pipe outside the dwelling. Keep in mind
that each elbow used reduces draft by 15%; it is good practice to add 3’ (three feet) of vertical
rise for each elbow used. Example: After the 2
nd
elbow used, have 6’ (six feet) of vertical rise
before terminating your vent pipe.
UNIT PREPARATION
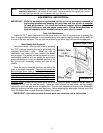
1. Attach the spring handle to the door by turning it counterclockwise.
Important: Also check hopper latches – must be tight so that the top is sealed to prevent
back-burn.
2. Test your 110-volt outlet for current and then plug in the unit. (We highly recommend a surge
protector for our pellet unit, as the control panel is electronic).
3. It is important to note that this stove is equipped with a dual auger system. The top auger runs
intermittently and drops pellets to the bottom auger; the bottom auger runs constantly and
simply pushes the pellets forward to the burn pot. The control board (“Heat Range”) setting
determines the top auger feed rate.
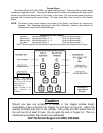
4. The stove has a digital read-out control board and is started by pressing the “ON” touch pad.
This will start the upper auger, bottom auger and exhaust blower. The room air blower will start
later as the stove reaches the pre-set blower temperature (see “Control Board” section for
further explanation).
5. Check to be sure both augers and the exhaust blower are operating before connecting the unit
to the flue system. Be sure to “dry run” your unit for 20 minutes before connecting it to the flue
(it should stop automatically after 20 minutes).
Visit our web site at www.englanderstoves.com for helpful information,
fre
q
uentl
y
asked
q
uestions,
p
arts/accessor
y
orders and more!