IMPORTANT INFORMATION:
1. Check local installation codes for your area. Call your Homeowner’s Insurance representative for
inspection of your stove’s installation.
2. This unit is specifically designed to be installed in a masonry fireplace only. Use of this unit as a
freestanding unit, or modifications intended to alter this unit for use as a freestanding unit are
illegal and will void your warranty.
3. Read and comply with the instructions in this manual.
4. This unit should be tested (dry run) before loading pellets for 20 minutes. The stove should
automatically shut itself off after the 20-minute dry run.
5. Your stove is designed to burn Premium Wood Pellets only. Burning pea coal, cherry pits, or
anything other than wood pellets will void your warranty. Pellets with high ash content will burn
dirty and require the unit to be cleaned more often. This unit is designed for use with ¼” diameter
pellet fuel. Using pellets longer than 2” can bind the auger and require frequent manual removal.
6. Be sure your pellets are not damp or wet. Keep sawdust out of the unit.
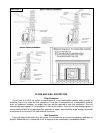
7. Use three-inch (3”) U.L.-approved PELLET VENT TWIST-LOCK PIPE when installing this stove
and
follow the manufacturer’s specifications for installation and clearances (we highly
recommend Simpson Dura-Vent pellet twist-lock pipe). Even though this pipe interlocks, it is a
good idea to seal all connections with high temperature silicone. Use at least three screws to
secure the pipe to this unit’s exhaust blower. Also, if you do not use U.L. - approved twist-lock
pellet pipe, be sure to use U.L.-approved Pellet Vent pipe, and fasten each joint of the pipe with
at least three screws.
8. Outside combustion air is mandatory for these units to work properly. Make this connection using a 1
7
/
8
” I.D. metal pipe (steel, aluminum or copper) and coupler. Be sure to secure the pipe to the unit
with a clamp or aluminum tape. The outside end should be covered (screened) to prevent any foreign
matter from entering the system. Try to keep the number of bends in this pipe to a minimum
.
NOTE: If an older unit, measure the opening to determine what size pipe to use.
NOTE: If the total run of the connection exceeds 6’, use 3” metal pipe and coupler instead.
9. Regularly inspect the burn pot area and, if any crust forms, remove it with a poker.
10. The ash in the burn pot should be removed regularly, depending on your burn rate. The area to
the right and left of the burn pot is for ash storage; keep the air holes in the burn pot clean for a
more efficient burn. Check your exhaust system frequently. Refer to “Ash Removal and
Disposal” section.
11. Keep pellets and all other combustible materials a safe distance from the unit.
12. This unit may be installed in masonry fireplaces only, it is not rated for “zero clearance” or pre-
manufactured fireplaces. The hearth should be twelve inches (12”) from the face of the fireplace
to the edge and at least thirty-six inches (36”) wide. The unit requires eighteen inches (18”) of
protection in front of the firebox. If you do not have enough space, it can be achieved with a UL
approved floor protector. This type board can be purchased from most retailers that deal in
hearth products.
13. Horizontal runs should not exceed four feet (4’) with a maximum vertical flue height of thirty five
feet (35’). At fifteen feet (15’), the pipe should be increased to four inch (4”) pellet vent pipe.
4


