


ACCESSORY ITEMS
The following accessories can be added to your unit at anytime after purchase; however, let the
unit cool down before adding any accessories.
Thermostats
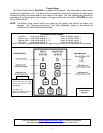
WALL: An external wall thermostat (such as our Part # GU-1E30-914) can be used on our pellet
units as long as it is a low-voltage that works with millivolt systems. After unplugging the unit, locate
the jumper wire (J-3) on the bottom of the control panel. The two screws should then be loosened
and the jumper wire removed from the board. Next, the two thermostat lead wires should be slipped
into these openings and the screws tightened; the jumper wire should be saved for future operation
without a thermostat.
The unit will operate differently once the wall thermostat is connected – we recommend the
Control Board be set at “9” on Heat Range and Blower Speed while using the thermostat. Refer to
the section on “Start-up Procedure” for information on cold starts.
AC-103, AC-103BN Lip Trim
There is one piece of J-Channel trim in this kit that snaps onto the ash apron lip of the stove.
Match the channel with the correct edge of the ash apron, then remove the protective covering from
the trim and force the piece onto the edge. Although it should stay in place, high temp silicone can be
used to secure it if necessary.
NOTE: For stoves manufactured prior to 2001, the part number for this kit is AC-101-PU.
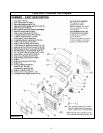
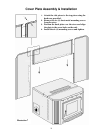
AC-104 Brass Trim
This kit consists of four (4) pieces of J-Channel brass trim. The brass will fit on the bottom lip of
the stove (note: the AC-103 lip trim is included in this kit) and the three outside edges of the back
plate. The stove lip trim is simply matched to the proper edge and pressed onto the stove; the back
plate trim is assembled together with the two angle clips and then slipped over the back plate. The
top piece of this trim must be twisted out to go over the top lip of the cover plate. After the screws in
the angle clips are tightened, the trim will stay in place. NOTE: For models manufactured 2001 and
later, there will be an extra piece of J-Channel trim left over (five pieces total will be in the kit).
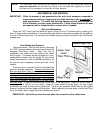
AC-106-P (SH-106-P), AC-106-PBN Window Trim
Window trim can be attached by using the provided spring clip(s) and some high temperature
silicone (optional). Insert the tee end of the spring clip into the channel on the edge of the trim – then,
turn the clip and set the other end of the clip into the channel. The spring clip will hold well if it is
placed on the top edge of the trim before placing the trim in the window of the stove. Place the top
edge with the clip into the window opening, then push the bottom edge of the trim flush with the
window. We also suggest that high temperature silicone be used on the corners, to ensure the trim
will stay in place.
AC-AV /AC-AVT Ash Removal System
The loveless ash vacuum system (Part # AC-AV) allows the user to quickly and thoroughly clean
out the unit once it is shut down. And while this unit cannot be used while there is a fire in the unit, it
has a metal body and non-combustible filters which are not susceptible to damage if an ember does
get vacuumed up with it. The ash vacuum tool kit (Part # AC-AVT), ordered separately, contains
tools which are used to get into tighter places to more thoroughly clean your unit
Accessories can be ordered from the factory at:
(Parts orders ONLY) -- (800) 516-3636, or on our web site:
www.englanderstoves.com.
Questions/Problems: Please call Technical Support at (800) 245-6489.
19