


Type 99
10
CAUTION
To avoid part damage due to over
compressing the main spring seat, always
use main spring seat 1E242724092 with
main spring 0W019127022.
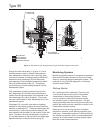
13. Install the main spring and main spring seat,
turning the main spring seat until its bottom
shoulder is even with the bottom thread of the
diaphragm rod.
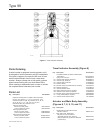
14. Install a new spring case gasket (key 57,
Figure 9), the spring case, and the four cap
screws with 340 to 420 inch-pounds (38,4 to
47,5 N•m) of torque, making sure the indicator
stem, O-ring, and gaskets (keys 103, 111, and
108, Figure 6) are installed If used.
15. Connect the loading tubing, then refer to the
Startup section for putting the regulator
into operation.
Type 61L, 61LD, 61LE (Low), or 61H
(High Pressure) Pilots
This procedure is to be performed if changing the
control spring for one of a different range, or if
inspecting, cleaning or replacing any other pilot parts.
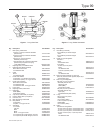
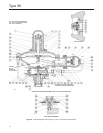
Key numbers are referenced in Figure 9.
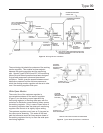
1. Remove the closing cap (key 46) if used and
unscrew the adjusting screw (key 45) to relieve
control spring compression.
2. Disconnect the loading tubing (key 53) and pilot
supply tubing (key 24).
3. Unscrew the eight cap screws (key 47) and remove
the pilot assembly from the lower casing (key 29).
4. Use the projecting prong in the relay valve body
(key 39) as the restraining member and remove
the diaphragm nuts (keys 13 and 51). Separate
the parts and inspect the diaphragms (keys 30
and 40) and O-ring seal (key 33). Replace if worn
or damaged.
5. Unscrew the bleed orice (key 52) from the yoke
(key 37). Also removed with the bleed orice are
the relay disk assembly (key 48) and bleed valve
(key 50). These parts can be unscrewed for
inspection and replacement, if necessary.
6. When reassembling the pilot, the relay disk holder
assembly and both diaphragms should be
tightened on the yoke after it is placed in the body.
Note
Before putting the relay spring case over
the diaphragm, make certain the yoke is
square with respect to the prong in the
relay body. (The yoke can bind on the
prong if it is not square.)
7. Use care in reassembly to be sure the edges of
the diaphragms slip properly into the recess on
the lower casing and relay valve body. With the
pilot in place, check to see if it can be rocked. If
it does not rock, it is in place and the diaphragm
is free of wrinkles. With both diaphragms rmly
in place, install the cap screws using torque
150 inch-pounds (16,9 N•m) of torque. Tighten
using a crisscross pattern to avoid placing a
strain on the unit. Set the pilot control spring
(key 43) according to the adjustment information
in the Startup section.
8. Reinstall the closing cap (key 46, if used). If you
have a plastic closing cap, be sure that you have
a vent (key 60) in place of the pipe plug installed in
the low pressure pilot spring case.
Type 61HP (Extra High Pressure) Pilot
This procedure is to be performed if changing the
control spring for one of a different range, or if
inspecting, cleaning, or replacing any other pilot parts.
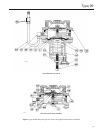
Key numbers are referenced in Figure 12.
1. Unscrew the adjusting screw (key 45) to relieve
control spring compression.
2. Disconnect the loading tubing and pilot supply tubing.
3. Remove the six cap screws (key 123) which fasten
the spring case (key 44) spring seat (key 68) and
control spring (key 43) to the pilot body.
4. Unscrew the diaphragm nut (key 128) and remove
a diaphragm plate (key 41), diaphragm (key 40),
and another diaphragm plate.
5. Unscrew the eight cap screws and remove the
pilot body (key 39) and gasket. Remove six cap
screws, seal washers and the ange adapter.
6. Unscrew the relief valve body (key 119) and remove
a diaphragm plate, diaphragm, and another
diaphragm plate. Inspect the diaphragm inserts
(key 150) and both diaphragms. Replace if worn
or damaged.
7. The relief valve assembly can be further
disassembled for inspection by unscrewing the
relief valve cap (key 118).