


12
XR10 Programming Guide
2841 E. Industrial Drive Springfield, MO 65802-6310 800-641-4282
8.1 ZONE INFORMATION
This allows you to define the operation of each protection zone used in the system.
A description of each programming option follows:
8.2 ZONE NUMBER
Enter the number of the zone you intend to program. Press COMMAND to enter a zone
name. For instructions on entering alphanumeric characters, see section 1.7.
8.3 ZONE NAME
Press the SELECT key and enter up to 10 characters for the zone name. A name must be
given to each zone in the system. This name can be displayed at the keypads when the zone
is bad or viewed in Display Events. The zone name is also sent to the receiver as part of a
zone event report.
A zone that is not part of the system must be marked *UNUSED*. To mark a zone unused,
delete the old name by pressing a top row SELECT key, then press the COMMAND key. The
programmer automatically programs the name as * UNUSED *. If you selected DEFAULTS?
NO YES to clear the panel's memory during Initialization, the zones will already be marked *
UNUSED *. See section 2.3.
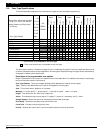
8.4 ZONE TYPE
The Zone Type defines the panel's response to the zone being opened or shorted. See the
chart in section 8.4A.
When you assign a Zone Type to a zone, responses are made automatically for the zone.
There are 11 Zone Types to choose from including Blank. The functional details of each
response are described in section 8.4A.
To enter a new Zone Type, press a top row SELECT key. The display lists the four Zone
Types shown below.
Blank, Night, Day, or Exit. Press COMMAND to display additional zone types.
Fire, Panic, Emergency, or Supervisory. Press COMMAND to display additional zone types.
Auxiliary 1, Auxiliary 2, Fire Verify, or Arming. Press the ARROW key to display the previous
zone types.
When the Zone Type you want to select is displayed, press the SELECT key beneath its
name. The chart in section 8.4A gives an outline of the Alarm Action for each Zone Type.
If you select Blank, Night, Day, Exit, Auxiliary 1, or Auxiliary 2 as the Zone Type, the zone
must be assigned to an area.
If you select Fire, Panic, Emergency, or Supervisory as the Zone Type, these are 24 hour
zones that are always armed and no area assignment is needed.
Press COMMAND to continue.
Refer to the Appendix section in this guide for zone type descriptions.
8.5 AREA NAME
Press a SELECT key to assign this zone to one of the following areas: INTERIOR,
BEDROOMS, or PERIMETER.
INT (Interior) - Assigns the zone to area 2, Interior.
BDRM (Bedroom)- Assigns the zone to area 3, Bedrooms. This option is only displayed in
Home/Away systems.
PERIM (Perimeter) - Assigns the zone to area 1, Perimeter.
8 - ZONE INFORMATION
ZONE INFORMATION
ZONE NO: –
NAME: * UNUSED *
A1 A2 FV AR
ZONE TYPE: BLANK
– – NT DY EX
F I PN EM SV
INT BDRM PERIM
AREA : PERIMETER