


www.desatech.com
113195-01C 9
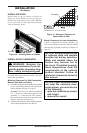
CAUTION: This replace in-
sert creates warm air currents.
These currents move heat to wall
surfaces next to replace insert.
Installing replace insert next to
vinyl or cloth wall coverings or
operating replace insert where
impurities (such as, but not lim-
ited to, tobacco smoke, aromatic
candles, cleaning uids, oil or
kerosene lamps, etc.) in the
air exist, may discolor walls or
cause odors.
WARNING: Before installing
in a solid fuel burning replace,
the chimney ue and rebox
must be cleaned of soot, creo-
sote, ashes and loose paint by a
qualied chimney cleaner.
Note: Your Vanguard replace insert is designed
to be used in zero clearance installations. Wall or
framing material can be placed directly against any
exterior surface on the rear, sides or top of your
replace insert, except where standoff spacers are
integrally attached. If standoff spacers are attached
to your insert, these spacers can be placed directly
against wall or framing materials.
IMPORTANT: Vent-free heaters add moisture to
the air. Although this is benecial, installing re-
place in rooms without enough ventilation air may
cause mildew to form from too much moisture. See
Air for Combustion and Ventilation, page 6.
IMPORTANT: Make sure the replace insert is
level. If replace insert is not level, log set will
not work properly.
CHECK GAS TYPE
Use the correct gas type (natural or propane/LP) for
your unit. If your gas supply is not correct, do not
install replace insert. Call dealer where you bought
replace insert for proper type replace insert.
WARNING: This appliance
is equipped for natural or pro-
pane/LP gas. Field conversion
is not permitted.
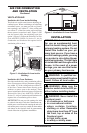
INSTALLATION
Continued
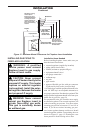
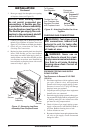
ELECTRICAL HOOKUP
(Blower Accessory)
This replace insert includes a blower assembly
with an electrical cord. The electrical cord is ve
feet in length. You must locate replace insert
within reach of a 120 volt grounded electrical
outlet. If not, install and properly ground GA3555,
three-prong 120 volt electrical outlet, in replace
insert. Follow instructions included in kit (see
Accessories, page 34).
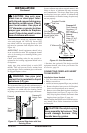
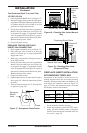
INSTALLING SURROUND KIT (GS38
OR GS43)
CAUTION: Close masonry
replace damper securely be-
fore installing replace insert. If
chimney does not have a damper,
block or cap top of chimney.
Failure to cap an open chimney
could cause drafts that can affect
the heater’s performance and
increase surface temperatures.
CAUTION: A GS38 or GS43
surround kit accessory must be
installed on this replace insert
before installing into your ma-
sonry replace or wall opening.
Note: Use the accessory which best covers
the existing masonry replace opening or wall
opening.
• Model GS38 Surround Kit (for use with re-
places with an opening smaller than 30" H and
38" W)
• Model GS43 Surround Kit (for use with re-
places with an opening 30" to 36
3
/
4
" H and 38
to 43" W)
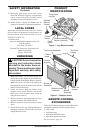
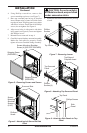
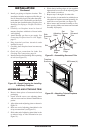
1. Using a 5/16" nut driver, remove two shipping
screws and screen (see Figure 5, page 10).
Discard these screws. Remove 5/16" screen
mounting shoulder screws (do not discard).
2. Remove log packaging from rebox cavity.
3. Align holes in left surround side panel with
screen mounting screw holes. Replace 5/16"
screen mounting shoulder screws removed in
step 1 (see Figure 6, page 10). Do not tighten.
Install Phillips screw in bottom (see Figure 6,
page 10). Repeat for right side.