


www.desatech.com
113195-01C 11
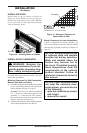
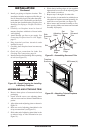
Mantel Clearances for Insert Installation
If there is a mantel above masonry replace, you
must meet minimum clearance between mantel
shelf and top of replace opening (see Figure 12,
page 12).
NOTICE: Surface temperatures
of adjacent walls and mantels
become hot during operation.
Walls and mantels above the
firebox may become hot to
the touch. If installed properly,
these temperatures meet the
requirements of the national
product standard. Follow all
minimum clearances shown in
this manual.
NOTICE: If your installation does
not meet the minimum clear-
ances shown, you must do one
of the following:
• raise the mantel to an accept-
able height
• remove the mantel
INSTALLATION
Continued
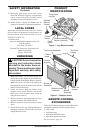
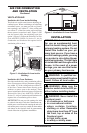
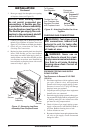
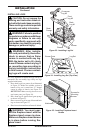
INSTALLING HOOD
Install hood to top of rebox as shown in
Figure 10. Use 5 Phillips screws, provided, to
attach hood to replace insert and 2 Phillips
screws, provided, to attach hood and surround
sides to replace insert.
Figure 10 - Installing Hood to Firebox
Screws
INSTALLATION CLEARANCES
WARNING: Maintain the
minimum clearances. If you can,
provide greater clearances from
oor, ceiling and adjoining wall.
Carefully follow the instructions below. This will
ensure safe installation.
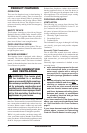
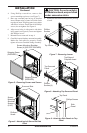
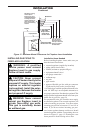
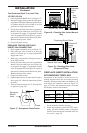
Minimum Clearances For Side Combustible
Material, Side Wall and Ceiling
A. Clearances from the side of the replace cabinet
to any combustible material and wall should
follow diagram in Figure 12, page 12.
Example: The face of a mantel, bookshelf,
etc. is made of combustible material and
protrudes 3
1
/
2
" from the wall. This combus-
tible material must be 4” from the side of the
replace opening (see Figure 11).
B. Clearances from the top of the replace opening
to the ceiling should not be less than 42".
Figure 11 - Minimum Clearance for
Combustible to Wall
*Minimum 16" from Side Wall
*
Example