


51332 Rev. D
7
4
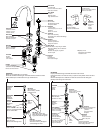
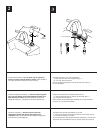
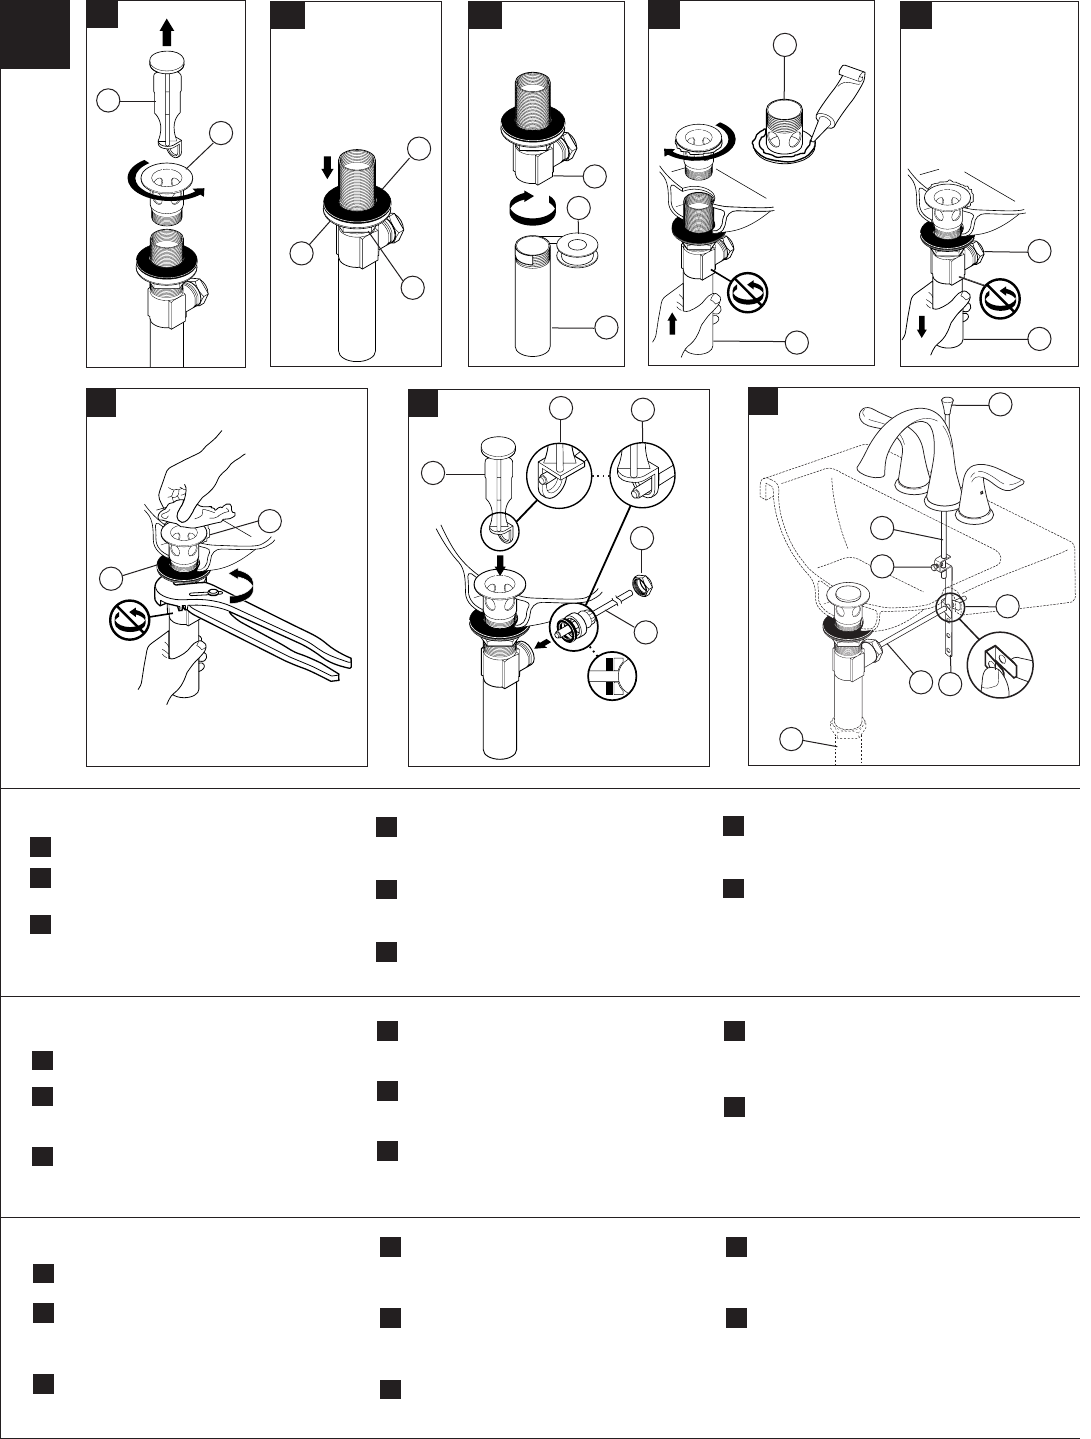
Metal Pop-up
A.
Remove stopper (1) and flange (2).
B.
Screw nut (1) all the way down. Push
washer (2) and gasket (3) down.
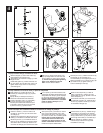
C.
Remove tailpiece (1) from body (2), add
Teflon
®
tape (3), replace tailpiece.
D.
Applysiliconetoundersideofflange(1).
Insert body (2) into sink. Screw flange (1)
into body (2).
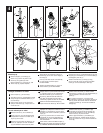
E.
Pivot (1) must face faucet. Pull assembly
(2) down firmly and hold in place.
DONOTTWIST.
F.
Tightennut/washer/gasket(1),cleanoff
excesssilicone(2).DONOTTWIST.
Step 3a
Step 3b
Step 3e.1
Step 3f
Step 3c
Step 3e
SILICONE
A.
B.
C.
D.
E.
F.
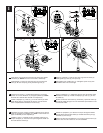
Step 3g
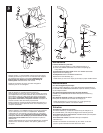
G.
G.
Remove pivot nut (1). Install horizontal rod (2) and
stopper(3)asremovable(4)ornon-removable(5).
Handtightenpivotnut(1).
H.
Attachhorizontalrod(1)tostrap(2)using
clip (3). Insert lift rod (4) into strap and tighten
screw(5).Connectassemblytodrain(6).
Desagüe automático de metal
A.
Quiteeltapón(1)yelreborde(2).
B.
Atornillelatuerca(1)completamentehasta
abajo.Empujelaarandela/roldana(2)yel
(3) hacia abajo.
C.
Quiteeltubodecola(1)delcuerpo(2),
apliquecintaTeflon
®
(3), coloque otra vez
el tubo de cola.
D.
Apliquesilicónalaparteinteriordelreborde
(1). Inserte el cuerpo (2) en el lavamanos.
Atornilleelreborde(1)enelcuerpo(2).
E.
Elpivote(1)debedeestardefrenteala
llave.Haleelensamble(2)haciaabajo
firmementeysujételoensitio.NOLOGIRE.
F.
Aprietelatuerca/arandela/empaque(1),
limpieelexcesodesilicón(2).NOLOGIRE.
G.
Quitelatuercadelpivote(1).Instalelabarra
horizontal (2) y el tapón (3) como desmontable (4)
ofijo(5).Aprieteamanolatuercadel
pivote (1).
H.
Una la barra horizontal (1) a la barra chata
(2) utilizando el gancho (3). Introduzca la barra de
alzar (4) dentro de la barra chata de articulación
yaprieteeltornillo(5).Conecteelensambleal
desagüe(6).
Renvoi mécanique en métal
A.
Enlevezlabonde(1)etlacollerette(2).
B.
Serrez l’écrou (1) pour le faire descendre
complètement. Poussez la rondelle (2) et
le joint (3) vers le bas.
C.
Enlevezleraccorddroitdevidange(1)du
corps(2),appliquezdurubandeTeflon
®
(3), puis remettez raccord droit en place.
D.
Appliquezducomposéàlasiliconesousla
collerette (1). Introduisez le corps (2) dans
le lavabo, puis vissez la collerette (1) dans le
corps (2).
E.
Lepivot(1)doitfairefaceaurobinet.Tirez
l’ensemble (2) vers le bas fermement et
maintenez-leenplace.PRENEZGARDE
DELETORDRE.
F.
Serrez l’écrou contre la rondelle et le joint (1),
puisenlevezlesurplusdecomposéàlasilicone
(2).PRENEZGARDEDETORDRELEPIVOT.
G.
Enlevezl’écroudupivot(1).Installezlatige
horizontale (2) et la bonde (3) de manière que
la bonde soit amovible (4) ou non amovible (5).
Serrezl’écrou(1)dupivotàlamain.
H.
Fixezlatigehorizontale(1)aufeuillard(2)à
l’aidedel’agrafe(3).Installezlatigedemano-
euvre(4)etserrezlavis(5).Fixezl’ensembleau
renvoi (6).
1
2
1
2
3
1
2
3
1
2
1
2
1
2
1
4
3
5
2
H.
1
5
3
4
2
6
4