


Drive Tray Conversion Instructions 1
PowerVault 130T Drive
Installation Instructions
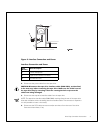
DLT Drive Tray Assembly
These installation instructions describes how to remove, install and configure a DLT Drive
Tray Assembly into the PowerVault 130T.
Before beginning this procedure be sure to take note of your drive configuration. You may
need this later to reconfigure your new or additional drives.
NOTE: Tape drives are hot swappable, meaning they can be removed and replaced without
powering off the library or interrupting its operations. Hot swapping should only be
performed by trained technicians.
WARNING: HIGH VOLTAGE! DO NOT TOUCH any components on the power
supply located within the electronics module or on the drive trays. Live voltage
could be present even though the unit is powered off. (Refer to U03 in Safety
Booklet)
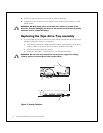
Removing the DLT Drive Tray Assembly
CAUTION: If the drives are daisy-chained do not disconnect them from the bus
without stopping all data processing on the channel. Before disconnecting the
external SCSI cables, make sure there is no activity on the SCSI bus. The host
must be quiesced, meaning that there is no activity on the SCSI bus. Do not
disconnect a hot bus. Any third party software must be quiesced. All signals
must be terminated at each end of the SCSI bus.
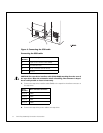
Follow the instructions below to remove a DLT Drive Tray Assembly. The tape drives are
located in the tape drive slots at the left rear of the library.
1. Loosen the three thumbscrews from the hinged door at the rear of the library and
open the door.