


4 5
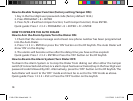
SIM card is properly installed, you will see a telephone symbol on the
display (Figure 4-2). You now have 30 seconds to teach the dialer. Press
the RECORD button (Figure 4-3) on the dialer and the display will show
“learning 0.” Press any key on the RF Keyfob. The display will then show
“learning 1” followed by a BEEP to conrm that it has learned the rst
keyfob. You then have another 30 seconds to teach it another keyfob
(“learning 2”) and so on up to 5 keyfobs.
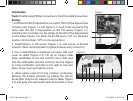
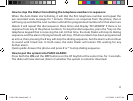
5. (Note: Tamper switch (Figure 2-6) arms automatically when
depressed and will cause alarm 1 to activate when released.
Disarm by entering password code 1234 into dialer followed by
the ESC button or by using the OFF button on the keyfob). Install
the back-up battery (included) into the dialer. Use a small
Phillips screwdriver to remove screw above battery cover
(Figure 2-4). Remove cover by sliding downwards. Plug in
battery pack making sure not to force onto pins incorrectly.
Put battery pack in space provided, close battery cover, and replace the screw.
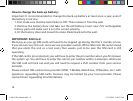
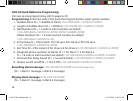
6. The dialer also has a terminal block (Figure 1-7) which has a normally open trigger input and a
12V, 150mA (maximum) output. Any sensor with a normally open output can be connected to the
TR2 and GND terminals and can be used to trigger the dialer. Any 12VDC siren or whistle can be
attached to the GND and SIREN terminals and will sound when the dialer is triggered.
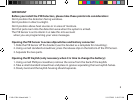
7. Continue on to the Advanced Operations to program your dialer or refer to the “CAD-05 Quick
Reference Programming” on page 14.
Figure 3
Figure 4
1
2
3
CAD-05 Kit Manual.indd 5 10/15/2009 9:40:53 AM