


Crestron CLS-C6 Series iLux
™
Integrated Lighting Systems
Changing Scene Presets
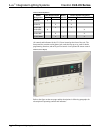
The CLS-C6 scene settings can be modified using the front panel controls, without
having to use a PC.
Changes to the lighting load levels and shade presets for one or more scenes can be
accomplished as follows:
1. In Standard mode, press the function button of the scene you wish to
modify and hold it for five seconds. (Make sure you press the center of the
button so both sides make contact.)
2. The two-digit display will first count down as the lighting loads fade to their
preset levels for that scene; it will then begin flashing between Sc. and the
scene number; the Lights LED will be lit, and the Save and Cancel LEDs
will flash.
3. Use the six function buttons to adjust the levels of the lighting loads for that
scene. Press the left side of the buttons to lower the lighting loads; press the
right side of the buttons to raise the lighting loads.
4. If you would like a certain lighting load to be unaffected by that scene
recall, press and hold the center of the button (so both sides make contact)
for three seconds. The top two and the bottom two LEDs of the associated
bargraph will be lit (and the display will show - -) to indicate that the level
of the lighting load will not change when the scene is recalled.
5. To change the shade presets for that scene press the Shades button; the
Shades LED will be lit.
6. Use the six function buttons to adjust the levels of the shade groups for that
scene. Press the right side to raise the shades; press the left side to lower
them.
Note that for shades that are not “presettable,” only full open or full closed
positions can be recalled as part of a scene.
7. If you would like a certain shade group to be unaffected by that scene recall,
press and hold the center of the button (so both side make contact) for three
seconds. The top two and the bottom two LEDs of the associated bargraph
will be lit (and the display will show - - ) to indicate that the level of that
shade group will not change when the scene is recalled.
8. To adjust the fade time, press the ^ and v buttons. When going up, the value
will go from 0 seconds to 59 seconds, and then 1 minute to 99 minutes.
When going down, the value will go from 99 minutes to 1 minute, and then
59 seconds to 0 seconds. The Min and Sec LEDs light as appropriate.
Adjustment to fade time can be made when either Lights mode or Shades
mode is active.
9. When all the lighting loads are at the desired level and shades are at the
desired position, press Save to save these settings as the new preset for that
scene. If you make a mistake while changing a setting, press Cancel to
discard changes and return to Standard mode before pressing Save.
10. Repeat the above procedures for all scenes that require changes.
11. If you would like a certain shade group to be unaffected by that scene recall,
press and hold the center of the button (so both side make contact) for three
seconds. The top two and the bottom two LEDs of the associated bargraph
will be lit (and the display will show - - ) to indicate that the level of that
shade group will not change when the scene is recalled.
User Guide - DOC. 6395B iLux
™
Integrated Lighting Systems: CLS-C6 Series • 7