


9
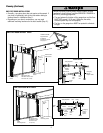
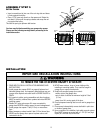
To avoid SERIOUS damage to garage door opener, use ONLY
those bolts/fasteners mounted in the top of the opener.
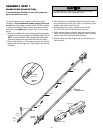
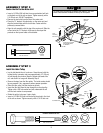
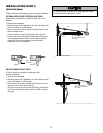
ASSEMBLY STEP 2
Fasten the Rail to the Motor Unit
• Insert a 1/4"-20x1-3/4 bolt into the cover protection bolt hole
on the back end of the rail as shown. Tighten securely with a
1/4"-20 lock nut. DO NOT overtighten.
• Remove the two bolts from the top of the motor unit.
• Place the “U” bracket, flat side down, on the motor unit and
align the bracket holes with the bolt holes. Fasten with the
previously removed bolts.
• Align the rail assembly with the top of the motor unit. Slide the
rail end onto the “U” bracket, all the way to the stops that
protrude on the top and sides of the bracket.
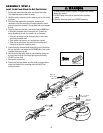
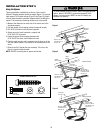
ASSEMBLY STEP 3
Install the Idler Pulley
• Lay the belt beside the rail, as shown. Grasp the end with the
hooked trolley connector and pass approximately 12" (30 cm)
of belt through the window. Keep the ribbed side toward the
rail, and allow it to hang until Assembly Step 5.
• Remove the tape from the idler pulley. The inside center should
be pre-greased. If dry, regrease to ensure proper operation.
• Place the idler pulley into the window as shown.
• Insert the idler bolt from the top through the rail and pulley.
Tighten with a 3/8" lock washer and nut underneath the rail
until the lock washer is compressed.
• Rotate the pulley to be sure it spins freely.
• Insert a 1/4"-20x1-3/4 bolt into the trolley stop hole in the front
of the rail as shown. Tighten securely with a 1/4"-20 lock nut.
Motor Unit
Sprocket
“U” Bracket
Lock Nut
Bolts
SLIDE RAIL TO STOPS
ON TOP AND SIDES
OF BRACKET
Cover
Protection
Bolt Hole
Bolt
Idler
Pulley
Trolley
Stop Hole
Bolt
Trolley
Connector
Pulley
Rail
Bolt
Nut
Washer
Lock Washer 3/8"
Nut 3/8"
Idler Bolt
Screwdriver
Idler Pulley
Grease
Inside Pulley
Lock
Nut
Lock Nut
1/4"-20
Bolt 1/4"-20x1-3/4"
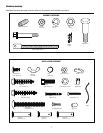
HARDWARE SHOWN ACTUAL SIZE
Nut 3/8"
Idler Bolt
Lock Nut 1/4"-20
Bolt 1/4"-20x1-3/4"
Lock Washer 3/8"
HARDWARE SHOWN ACTUAL SIZE