


::::: ::_.:'. -:.-.+:':':":_;:':':':::'+"""":":':"""::""'-':::: ::: :::;:::::.-..:-':1;:':'i"i:i$i:i:"i:i:i:_:'::_""":!:i:i_i_i:_ ?::_ _"_
Read the Safety instructions on page 12. They also apply to doors without tracks.
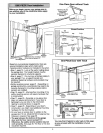
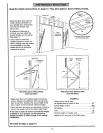
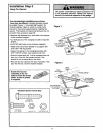
• Close the door and mark the
inside vertical centerline of
your garage door. Extend the
line onto the header wall
above door.
If headroom clearance is
minimal, you can install the
header bracket on the ceiling.
See page 14.
• If you need to install the
header bracket on a 2x4 (on
wall or ceiling), use lag screws
(not provided) to securely
fasten the 2x4 to structural
supports as shown.
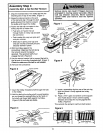
Header Wall
Vertical
Centedine
2X4
Unfinished --
OPTIONAL CEILING MOUNT
FOR HEADER BRACKET
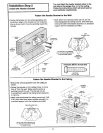
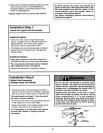
Door
Jamb
Hardware
Header Wall
l _ Highest Point
of Travel
/
One-piece door without track
jamb hardware
Header Highest Point
Wall of Travel
s
/,,'/
a
One-piece door without track
pivot hardware
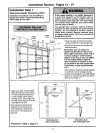
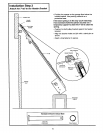
• Open your door to the highest point of travel as
shown. Measure the distance from the top of the
door to the floor. Subtract the actual height of the
door. Add 8" to the remainder. (See Example).
• Close the door and draw an intersecting horizontal
line on the header wall at the determined height.
If the total number of inches exceeds the height
available in your garage, use the maximum
height possible, or refer to page 14 for ceiling
installation.
EXAMPLE
Distance from top of door
(at highest point oftravel) to floor ........................... 92"
Actual height of door ............................................. -88"
Remainder ................................................................ 4"
Add ......................................................................... +8"
Bracket height on header wall ............................... 12"
(Measure UP from top of CLOSED door.)
Proceed to Step 2, page 14.
13