


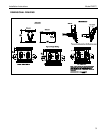


Installation Instructions Model PNR™
5
INSTALLATION
WARNING: Improper installation can result in serious
personal injury!
WARNING: It is the responsibility of the installer to
verify that the wall to which the PNR is anchored will
safely support five times the combined load of all
attached components and equipment. If not, reinforce
the structure before installing the PNR.
1. Locate two wood studs 16” apart on center
2. Determine the exact mounting location prior to
installation, considering screen size and the unit’s
total swing arm radius. Keep in mind that the PNR
must be mounted to wood studs that are 16” apart on
center.
NOTE: Mount the PNR between parallel wall studs or
other supporting framework that is vertical or
horizontal.
3. Using a stud sensor, locate the two wood studs where
you will mount the PNR.
4. Draw a level plumb line to indicate the desired height
of the top mounting bracket.
5. With an assistant, lift and hold the PNR against wall.
Use a pencil, awl, or small nail to mark the mounting
holes where two pilot holes will be drilled into the
center of the wood studs. Make sure the mounting
holes are level.
6. With an assistant, lay the PNR down on the floor.
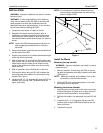
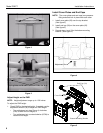
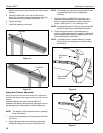
7. Drill two pilot holes using a 9/32” drill bit where the
mounting holes were marked for anchoring the top
bracket. See Figure 1.
8. Install two 3/8” x 2-1/2” lag bolts (50) and two 3/8” flat
washers (60), through PNR Top Bracket and into
upper pilot holes.
NOTE: Do not tighten the lag bolts down at this time.
Leave enough space between the wall and lag
bolts to hang the PNR.
Figure 1
Install the Mount
Mounting the top bracket
WARNING: Improper installation can result in serious
personal injury!
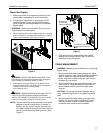
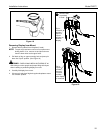
1. With an assistant, lift and hang the PNR on the two
lag bolts and washers previously installed on the wall.
(See figure 2).
NOTE: Make sure washers are installed in front of the
top bracket, not behind the bracket.
2. Slide the PNR into the desired position on the wall
and tighten the two lag bolts.
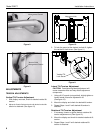
Mounting the bottom bracket
1. Mark the two mounting holes in the bottom mounting
bracket (See figure 3). Make sure to align the holes
parallel to the holes drilled in the top bracket.
2. Drill two pilot holes in the wall studs using a 9/32” drill
bit.
3. Install two 3/8” x 2-1/2” lag bolts (50) and two 3/8”
washers (60) through PNR Bottom Bracket into the
lower pilot holes.
4. Tighten all lag bolts.
Wood Studs
Wall
Pilot
Holes
16"