


5-GB
5
114A2804E-GB
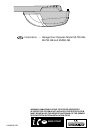
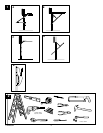
Aligning the Safety Sensors
Plug in opener. Indicator lights in both sending and receiving eyes
will glow steadily if wiring connections and alignment are correct.
Sending eye orange indicator light will glow regardless of alignment or
obstruction. If green indicator light in receiving eye is off, dim, or
flickering (and invisible light beam path is not obstructed), alignment is
required.
• Loosen sending eye wing nut and readjust, aiming directly at
receiving eye. Lock in place.
• Loosen receiving eye wing nut and adjust sensor until it receives
sender’s beam. When green indicator light glows steadily, tighten
wing nut.
Troubleshooting the Safety Sensors
1. If the sending eye indicator light does not glow steadily after
installation, check for:
• Electric power to the opener.
• A short in the white or white/black wires. These can occur at
staples, or at opener connections.
• Incorrect wiring between sensors and opener.
• A broken wire.
2. If the sending eye indicator light glows steadily but the receiving
eye indicator light doesn't:
• Check alignment.
• Check for an open wire to the receiving eye.
3. If the receiving eye indicator light is dim, realign either sensor.
NOTE: When the invisible beam path is obstructed or misaligned while
the door is closing, the door will reverse. If the door is already open, it
will not close. The opener lights will blink 10 times.
Program your Opener & Remote
Activate the opener only when door is in full view, free of
obstruction and properly adjusted. No one should enter or leave
garage while door is in motion. Do not allow children to operate
push button(s) or remote(s). Do not allow children to play near
the door.
Your garage door opener receiver and remote control transmitter are
set to a matching code. If you purchase additional remote controls, the
garage door opener must be programmed to accept the new remote
code.
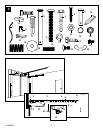
Program the Receiver to Match Additional Remote Control Codes:
Using the orange “LEARN” Button
1. Press and release the orange “learn” button on the opener. The
learn indicator light will glow steadily for 30 seconds (1).
2. Within 30 seconds, press and hold the button on the hand-held
remote that you wish to operate your garage door (2).
3. Release the button when the opener light blinks. It has learned the
code. If the light bulb is not installed, two clicks will be heard (3).
23
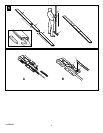
Using the Multi-Function Door Control:
1. Press and hold the button on the hand-held remote that you wish to
operate your garage door (4).
2. While holding the remote button, press and hold the LIGHT button
on the Multi-Function Door Control (5).
3. Continue holding both buttons while you press the push bar on the
Multi-Function Door Control (all three buttons are held) (6).
4. Release buttons when the opener light blinks. It has learned the
code. If the light bulb is not installed, two clicks will be heard (7).
Now the opener will operate when the remote control push button is
pressed. If you release the remote control push button before the
opener light flashes, the opener has not learned the code.
To Erase all Remote Control Codes
To deactivate any unwanted remote, first erase all codes: Press and
hold the orange “learn” button on opener until the learn indicator light
goes out (approximately 6 seconds). All previous codes are now
erased. Reprogram each remote or keyless entry you wish to use.
3-Channel Remote:
If provided with your garage door opener, the large button is factory
programmed to operate it. Additional buttons on any rolling code
3-channel remote or mini-remote can be programmed to operate this
or other rolling code garage door openers.